Search This Blog

Saturday, March 27, 2010

Coconut Pecan Brownies

I found this recipe at For the Love of Cooking. It's a nice variation on your standard brownie. Although the recipe only makes a 8x8-inch pan, it was plenty for our large family because the brownies are rich enough that you don't need much to feel satisfied.

Coconut Pecan Brownies

Original recipe from Epicurious
Makes nine ample brownies

Topping:
3/4 cup of sweetened coconut, shredded
3/4 cup of pecan pieces
1/4 cup of brown sugar
1/8 tsp of salt
2 tbsp butter, melted

Mix all ingredients together until well combined. Set aside.

Brownies:
1 1/4 sticks (10 tablespoons) unsalted butter
1 1/3 cups granulated sugar
1 1/2 teaspoons vanilla
3 large eggs
2/3 cup all-purpose flour
1/2 cup unsweetened cocoa powder
1/2 teaspoon baking powder
1/2 teaspoon salt

Preheat oven to 350 degrees and coat an 8x8 baking dish with cooking spray.

In a saucepan, melt butter over moderately low heat. Remove pan from heat and stir in sugar and vanilla. Add eggs, 1 at a time, beating well with a wooden spoon after each addition. Sift the flour, cocoa powder, baking powder, and salt into a separate bowl add to the sugar mixture until just combined well.

Spread batter evenly in pan. Bake brownies in the middle of the oven for 20 minutes; remove from oven and add topping to the top then continue to bake for an additional 15-20 minutes or until a tester comes out of the center with crumbs adhering to it. Cool brownies completely in pan on a rack before cutting. Enjoy.

Thursday, March 25, 2010

Eggrolls

About a year ago we realized one of Bob's lifelong dreams: to become proficient in the making of eggrolls. It was actually easier than we had imagined, especially with numerous children to help roll them up. We invited a friend of ours to teach us how to make them; her parents are from the Phillippines, and her eggroll-making prowess is legendary in our neighborhood. We've been making them ever since.

The possible variations with eggrolls are endless. On the night we learned how to make them, we used simple hamburger as the filling. Because Bob wanted to make more of a Vietnamese-style eggroll, we've since settled on using a combination of shrimp and ground pork most of the time. You can also use ground turkey or chicken (or any other type of ground meat) or make them completely vegetarian. If you want to speed up the process, you can buy coleslaw mix and shredded carrots at the grocery store in the produce section.

Eggrolls freeze well before they're cooked. In fact, we've often been surprised that they seemed to taste even better when we take them straight from the freezer to the frying pan (better than when we cook them fresh, that is). This recipe makes quite a large batch, even for our large tribe. We usually freeze at least half of them and serve them for a second meal.

Cooked eggrolls can also be rewarmed for a tasty snack, although I'm warning you: don't heat them in the microwave. They'll turn into a droopy mess and won't really taste good. Try putting them in the regular oven for a few minutes at 350 degrees.

There are also a variety of possible dipping sauces for eggrolls. Some of us like hot mustard (you can buy it in powdered form either at the Asian market or sometimes in the Asian section at the grocery store; mix it with water and drip it on the eggroll. Believe me, you'll only need a few drops). We also like sweet chili sauce, which can also be found at the Asian store. A favorite way of eating them is to wrap an eggroll in a leaf of iceberg lettuce and dip it in nuoc cham sauce (scroll down to the bottom of the bahn mi recipe to find it.

Eggrolls
(Makes about 50 eggrolls)


1 lb. ground meat (beef, pork, turkey or any combination of the three. We usually use about a pound of ground pork and add some finely chopped shrimp sautéed in butter and garlic).
½ + head cabbage, finely shredded
2+ large carrots, finely shredded
1 bunch green onions, finely chopped
1 T. garlic, finely minced (or garlic powder)
1 ½ teaspoons ginger, finely minced (or powdered ginger)
1 bunch cellophane (bean thread) noodles, available at Asian markets. Cook according to package directions. Chop cooked noodles into thirds or fourths.
Salt and pepper to taste
Oil for frying
Two packages spring roll wrappers (use the kind from better Asian stores rather than the grocery store brand. They stretch a little more and are a little more durable. They also don't bubble as much during frying.)

Brown the meat in a large skillet. Drain off the fat. Add the carrots and cabbage. Gently stir fry until the vegetables are softened. Add the onions, cook for an additional 1-2 minutes. Add garlic, ginger, salt and pepper. Mix gently to distribute seasonings. Add bean thread and mix lightly. Let cool.

Put wrapper on a flat surface. Starting at the bottom corner, put about 1 generous tablespoon of filling. Roll upwards until you reach the middle of the wrapper. Fold in the two side corners and continue rolling upwards. Once you have about 1-2 inches of wrapper left, moisten the top sides of the wrapper with water to seal the eggroll. Here is a guided tour of how to fold up an eggroll:

1. Put the tablespoon of filling toward the bottom corner of the wrapper.


2. Fold the wrapper over to cover the filling, and pull it tight with your fingers (this is where having a flexible wrapper comes in handy).


3. Fold the sides of the wrapper in so that they form two parallel lines (much as you would fold a burrito).


4. Roll the wrapper up the rest of the way, keeping it tight. Then seal the remaining open corner with a bit of water, pressing it until it stays closed (believe me, you don't want it coming open while it's frying).

Heat oil (about 1-inch in depth) in a frying pan. Fry eggrolls in small batches until golden brown (about 3-5 minutes). You are frying them until they look the way you want them to; the filling is already cooked, so you don't have to worry about food safety issues.

Serve with sweet and sour sauce.

Other ingredients that you can add to the filling are water chestnuts, mushrooms, diced potatoes, or any other vegetables that you like.
Tuesday, March 23, 2010

Chicken Parmesan

A couple of years ago, a friend loaned me her personal cook book so that I could copy a recipe for something she had made for me. These are the best kinds of cookbooks--full of recipes that people make, eat and love on an every-day basis. I don't remember which recipe I borrowed the book for, but I do remember that I saw this recipe as well and knew that I must have it. I made it soon thereafter, and it's been a family favorite ever since.

This is another meal that looks fancier than it really is. It's easy to make, and while it won't win any prizes for being healthy, it will fill up even the hungriest of teenage boys. You can use whatever kind of sauce you like; I confess that part of the beauty of this meal for me is that I usually make it with a bottle of store bought sauce, which makes it very, very easy.

Although I don't think instructions to do so were included in the original recipe, I pound the chicken breasts out to about 1/4 inch thickness. Being the frugal souls that we are (and having a few little tiny girls to off set those hungry teenage boys), we've been known to get two or three servings out of a single chicken breast. It also ensures that the chicken gets cooked all the way through without drying out. Also, we like this dish saucy, so I use a 28-ounce jar of sauce and often augment that with an 8-ounce can of tomato sauce rather than the 12 ounces or so called for in the recipe. This gives us ample spaghetti sauce to put over the noodles that we serve with the chicken. Feel free to dress up the sauce; I often add some sliced, fresh mushrooms or fresh herbs like basil or oregano.

Chicken Parmesan

Serves 6

2 large eggs
2 tablespoons milk
1 cup Italian-flavored bread crumbs
¼ cup flour
¼ tsp fresh ground pepper
6 chicken breasts
3 cloves garlic, diced
1 ½ cups spaghetti sauce
1 1/2 cups shredded mozzarella
¼ cup grated parmesan
2-4 tablespoons olive oil

Preheat oven to 350 degrees.

Beat eggs and milk together in shallow pie dish. Place bread crumbs in another dish close by. Combine flour, salt and pepper in a plastic bag. Add chicken breasts to bag, one at a time. Shake to coat lightly with flour. Dip coated breast in egg mixture, letting excess drip off. Roll breasts in bread crumbs to coat well.

Heat oil in skillet over medium heat. Add garlic cloves and cook for one minute. Push garlic to edge of skillet and add chicken to pan. Cook 3-4 minutes per side. Transfer breast to 13x9 inch baking dish. Add spaghettis sauce to same skillet and simmer for 3-4 minutes until heated through. Pour over chicken breasts and sprinkle with cheeses.

Bake for 15 minutes or until cheese is melted. Serve with small servings of spaghetti noodles.

Friday, March 19, 2010

Roasted Potatoes

We just finished eating these potatoes for dinner. I thought I was making far too many of them, but they completely disappeared. They are easy, relatively healthy, and inexpensive as long as you find the red potatoes on sale. They are one of those dishes that dresses up a meal without a lot of extra work for you.

The only real secret to this dish is getting the right amount of olive oil. Too much and you'll drown them, not enough and they won't brown and crisp. At their best, these potatoes are both creamy inside and cruncy on the outside. Here is what they look like when they're ready to go into the oven:


Roasted Potatoes
8-9 red potatoes, washed and sliced into wedges
2-3 tablespoons olive oil
1 teaspoon thyme
1 teaspoon rosemary
1 teaspoon rubbed sage
1 teaspoon salt
1/2 teaspoon fresh ground black pepper

Preheat the oven to 450 degrees. Place the sliced potatoes in a large bowl. Drizzle about 1 tablespoon of oil on them; sprinkle about 1/3 of each of the seasonings on top. Toss the potatoes. Repeat this process two more times until all of the seasonings have been used and the potatoes are well coated.

Spread the potatoes on a baking sheet. Bake in the oven for about 20 minutes. Remove them and stir them on the baking sheet. Return them to the oven and bake for another 20 minutes. They are done when they are golden brown.

Wednesday, March 17, 2010

Steak and Blue Salad

This is a salad idea that came from a local restaurant. I ordered it there for lunch a number of times; it was quite different each time I tried it. The last time I ordered it, they substituted the roasted red peppers , one of the highlights of the salad, with roasted hot chiles. I haven't been back.

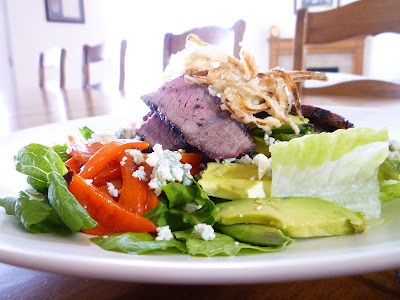
We dreamed up this salad last week when we had some leftover steak. Bob refreshed the meat by warming it on the grill. Then we sliced it thin and put 4-5 generous pieces on each salad. I kept the veggies relatively simple by including some mixed greens (primarily romaine), avocado, tomato, and of course, some roasted red pepper strips. We sprinkled blue cheese crumbles and topped the salad off with some onion straws* and homemade ranch dressing. We both agreed it was one of our favorite salads ever.

As with most salads, the measurements aren't really a precise recipe. But give it a try; this is a wonderful salad. This recipe makes enough for two meal-sized salads.

Steak and Blue Salad
1 head romaine, sliced into bite-sized pieces
1 tomato, sliced into thin wedges
1 avocado, sliced into strips
roasted red pepper cut into strips, tossed with a small amount of olive oil and seasoned with salt and pepper
4-5 slices steak
1-2 tablespoons blue cheese crumbles, depending on your taste
Onion straws
Ranch dressing

Layer the ingredients in the order listed. You may combine them in a cobb style or toss.

*Onion straws are very easy to make. I will do a post on them sometime soon. The short version of how to make them: Mix a tablespoon of flour with two tablespoons of corn starch. Add about 1/4 cup of water and mix well. Slice an onion in thin rings. Coat the rings in the batter until well covered. Fry for several minutes in oil until onions are light brown.

Monday, March 15, 2010

Puzzle Cake

I'm not sure why this cake is called a puzzle cake, unless it's because of the interesting contrasting colors on top of the finished product. This came from another of our virtually unused cook books, Old Fashioned Family Cookbook, by Clarice L. Moon, published by Ideals Publishing, Corp. I believe I acquired this series as a reward for subscribing to a local newspaper. For each month I continued my subscription, I earned another cookbook in the series.

 As you might expect, the recipes in this cookbook were not incredibly novel or exciting. They are, well, traditional. As a result, I found that I already had favorites of many of the dishes included (jambalaya, for example, or tuna casserole). Others were completely unappealing (take salad dressing cake or ham loaf). I also don't love the format--few photos of the end result, and the photos aren't usually any where close to the recipe in the book. But puzzle cake looked like it had potential, so I tried it last Monday night. The result was acceptable. No one has been begging for this dessert since then, but no one turned it down, either, and most of the plates were clean when we were finished even though one of the kids came to a stark realization that dates are a dried fruit (gasp!), not the nuts she had believed them to be as we have used them in other recipes for years.

Puzzle Cake
1 1/2 cups flour
1/2 cup brown sugar, firmly packed
3/4 cup softened butter
Mix together the flour, sugar and butter until crumbly. Set aside one-half of the crumb mixture. Spread remaining crumb mixture in an 8 x 12-inch pan and pat down. Bake in a 350-degree oven for ten minutes. Remove from oven and spread on Filling (see recipe below). Sprinkle reserved crumbs on top. Bake for an additional 25 minutes.

Filling
1/2 cup chopped dates
1 cup shredded coconut
1/2 cup chopped nuts
2 egg whites
3/4 cup sugar
1 teaspoon vanilla

Combine dates, coconut and nuts. Whip egg whites until stiff and add sugar and vaniilla. Fold in the date mixture.

The dessert was good, but probably not worth keeping the cookbook over. Nevertheless, there are a couple of other basic recipes that might serve me well--like a good basic biscuit recipe or a couple of ideas for breakfast cake. Stay tuned for the final verdict.

Friday, March 12, 2010

Italian Herb Bread

I got this recipe from my friend Steffani and then modified it a bit based on my comparisons with a few other recipes. The end result is a pretty good knock off of the bread served at Macaroni Grill, although that's not necessarily what I was aiming for. My family finished off two loaves of this at dinner the other night, however. It's especially delicious when served with a dipping sauce of olive oil mixed with a little balsamic vineagar.

Italian Herb Bread

2 tablespoons yeast
2 1/2 cups warm water
2 tablespoons sugar

Mix together and let sit for 10 minutes.

Add:
3 tablespoons olive oil
1 tablespoon salt
2 tablespoon. minced fresh red onion
1 tablespoon dry or 2 tablespoons fresh chopped basil
1 tablespoon dry or 2 tablespoons fresh chopped rosemary
1 tablespoon dry or 2 tablespoons fresh oregano or thyme

Add:
2 cups flour

Mix well, then add:

4 cups more flour

Mix well. Knead 3 minutes in Bosch/mixer on high or by hand. Let rise till double (about 45 minutes to 1 hour).

Punch down. Divide into three round loaves and place on a greased cookie sheet. Baste with

1 egg white mixed with 1 tablespoon water

Sprinkle with sea salt

Raise uncovered until double (about 1 hour).

Bake at 375 for 25-30 minutes till golden brown

Wednesday, March 10, 2010

Roasted Asparagus

This is a recipe I learned from my neighbor, Michelle. It's simple, delicious and relatively healthy. It dresses up a meal with a minimum of effort and, as long as asparagus is on sale, a minimum of expense. Even the non-asparagus lovers in our family enjoyed it.

Roasted Asparagus
1-2 pounds asparagus
1-2 tablespoons olive oil
Salt and pepper to taste
2-3 tablespoons grated parmesan cheese

Preheat the oven to 400 degrees. Wash and trim the asparagus. Toss it in a large bowl with the olive oil. Sprinkle it with fresh ground salt and pepper. Bake in the oven for 15 minutes. Remove from the oven and sprinkle with parmesan cheese. Return to the oven for about one minute, until cheese is melted. Serve immediately.

Monday, March 8, 2010

Eggplant Parmesan


Eggplant parmesan is one of the few Italian dishes I cook that I actually learned to make in Italy. I lived for about nine months with a woman who had worked as a chef's assistant. She loved to cook. I loved to watch her cook (and sometimes even help). She made this for my birthday dinner in 1983, and I used to make it regularly when I returned to the US.

I've been under the impression for the past several years that my kids didn't care for this meal. Truth be told, I've only made it for them once. When I served it last week, several of them actually remembered it from a few years before and were glad to see it was back.

I've ordered eggplant at a variety of Italian restaurants, including Olive Garden and Macaroni Grill. It's very good at both of those places, but is somewhat different from the way I learned to make it. The restaurant variety is usually a breaded piece of eggplant (or more accurately several pieces of breaded eggplant) topped with red sauce and cheese. This recipe is more like an eggplant lasagna.

You'll need about one and a  half eggplants. Slice them about 1/4 inch thinck. Dip the eggplant slices in a pie plate with 2-3 beaten eggs in it, then dip it in a plate with about 2 cups of breadcrumbs on it. Pan fry the eggplant slices in a large skillet until they are golden brown on both sides. Then layer the eggplant in a 9 x 13-inch pan like this:


This is the first of three eggplant layers. Pour 3-4 ladels of sauce over the eggplant (I confess that while I have traditionally made sauce from scratch for use with this recipe, this time I used a bottle of spaghetti sauce from the store. I added a can of tomato sauce and a can of diced tomatoes to it to make sure there was enough to amply cover the eggplant, and also added 1/2 pound of cooked sausage to give it a little more flavor). On top of the layer of sauce, sprinkle grated mozzarella and parmesan cheese. Repeat this process two more times, ending with the sauce and cheese layer. I usually put a little extra cheese on the top layer for the sake of appearances.

Bake the eggplant at 350 degrees until the cheese is melted and slightly browned. Then serve it as you would lasagna.

Eggplant Parmesan
2 large eggplants, cleaned, trimmed, and sliced in quarter inch slices
3 eggs, beaten and placed in a pie plate
2 cups breadcrumbs (I use the kind with Italian seasoning in them)
2-3 tablespoons oil
1 large bottle of spaghetti sauce
1 8-ounce can of tomato sauce
1 14-ounce can of diced tomatoes
1/2 pound bulk sausage, browned and drained
1 1/2 cups grated mozzarella cheese
1 cup grated parmesan cheese

Dip the eggplant slices eggs, then dip it in a plate with the breadcrumbs on it. Heat the olive oil in a large skillet and fry the eggplant slices until they are golden brown on both sides. Then layer the eggplant in a 9 x 13-inch pan so that the bottom of the pan is completely covered. This is the first of three eggplant layers.

In the meantime, brown and drain the sausage and combine the bottled spaghetti sauce and other tomato products in a large sauce pan. Cook until warmed through.


Pour 3-4 ladels of sauce over the eggplant On top of each layer of sauce, sprinkle grated mozzarella and parmesan cheese. Repeat this process two more times, ending with the sauce and cheese layer. I usually put a little extra cheese on the top layer for the sake of appearances.


Bake the eggplant at 350 degrees until the cheese is melted and slightly browned. Then serve it as you would lasagna.

Friday, March 5, 2010

Roasted Red Peppers

One of the most useful skills I acquired this year was roasting red peppers, which was awfully convenient since I also developed a ravenous taste for the same. After paying $3 per bottle at the grocery store a few times, I was amazed to discover how remarkably easy it was to prepare them at home.

This actually isn't the first time in my life I've roasted red peppers. When I was in Italy in the early 80s, I remember roasting them over the burners of our gas range with an Italian friend who then taught me to make pepperonata, a pasta sauce with roasted red peppers as a base. I remember loving the sauce, but regretting the amount of time the tedious roasting process took.

This year I discovered that it's actually incredibly easy to roast peppers under a broiler. It can also be done on a barbecue grill, but that requires going outside, firing up the grill, turning the peppers, etc. The (very brief and simple) step-by-step instructions are below.

1. Wash the red peppers and slice them in quarters. Remove the seeds and membranes.

2. Place the peppers peeling side up so that they are as flat as possible (with as much outside surface facing upward as possible) in a baking pan. Place the pan in the oven, about 4 to 5 inches from the broiler. Broil on high until much of the surface of the peppers is blistered and black. The photo above shows a pepper that is fully roasted, although I actually probably could have left it under the broiler for another minute or so and it would have been easier to peel. On average, the roasting process takes about 10 minutes, so be patient.

3. Remove the peppers from the oven and put them in a sealable (zip top) plastic bag. This allows them to sweat so that the skin comes loose. After 10 minutes or so, remove them from the plastic bag and remove the peelings. The more thoroughly roasted the peelings, the easier it will be to remove the peel.

4. Use the peppers in any variety of dishes. I'll try to post some of my favorites here in the near future. I cook them with a chuck roast and onions to make a lovely goulash. They're also wonderful on salads or sandwiches. Add them to a tomato-based pasta sauce for a real treat.

If you want to make them more like the roasted red peppers you buy already prepared, put them in an airtight container with a little bit of olive oil--just enough to coat them. Then slice them into thin (1/4 inch) strips and enjoy!

Wednesday, March 3, 2010

Guide to Microwave Cooking

Guide to Microwave Cooking by Cynthia Kanneberg, Ideals Publishing Corporation, October 1978

I'm old enough to remember when most people didn't have microwaves. I don't think my family acquired one until at least late in my high school career. I remember the promise they held for making meal preparation effortless and lightning fast.

We use our microwave many times a day. We warm things up in it. We melt things. We thaw things. We even boil water. But the truth is we never really cook in it, as in prepare an entire meal or even an entire dish. And when I browsed this cookbook, on our shelf since we have no idea when, I could see why. The book includes many tantalizing recipes (orange-almond rice ring, corn and crab soup, for example), but somehow the idea of cooking them in the microwave made them seem cheap and unappetizing. I couldn't even bring myself to try them. Perhaps if the cookbook had also included stove top instructions (defeating the purpose of the book, I realize), I could have been a good sport about it.

So this book has been officially weeded. If you don't share my microwave hang up, let me know and it's yours. It's also available on Amazon for as little as $.01 used, $.89 new. Mine is a mint condition, hardcover copy that is yours for the taking if you act now.

Monday, March 1, 2010

Breakfast Burritos

This is a family favorite breakfast that is also remarkably easy to prepare. We quite often make it on weekend mornings; it's also frequently requested for birthday breakfasts. I wasn't a breakfast burrito fan until I married Bob. He has told me about his breakfast burrito odyssey that started when McDonald's first introduced their product twenty years or so ago. For the record, ours are improved enough over the golden arches variety that Bob can't really stomach fast food burritos anymore (except for the Carl's Jr. offering, which is very good).

We make these with Tortilla Land uncooked flour tortillas, so they need to be prepared before you roll up the finished product. We usually prepare all of the ingredients and then lay them out buffet-style on the island in our kitchen. Everyone makes their own, although the little ones usually need a little help with burrito rolling. The burrito featured in this photo actually ended up being more of an oversized taco because I stuffed it too full to roll it.

One of the great things about this recipe is that you can scale it larger or smaller very easily. It's not at all unusual for Bob to make himself a burrito for breakfast with leftover sausage, bacon, or ham.

Breakfast Burritos
Serves about 8 people
8 cooked tortillas (if you are using pre-cooked tortillas, you might want to warm them in the microwave for a few seconds)
1/4 to 1/2 pound of bulk breakfast sausage (a little goes a long way)
8 eggs (or one egg per person, if you're changing the number of servings)
1-2 cups frozen hash browns, fried until golden brown (this is another ingredient that is easily modified; we've used leftover breakfast potatoes or left the potatoes out all together. It makes a good filler, but the burritos work just fine without them).
1-2 roma tomatoes, diced in about 1/4-inch pieces
1/2 medium-sized yellow onion, diced small
1 cup grated cheddar or jack cheese (we usually prefer a mix)
Salsa to taste (use the salsa of your choice; we've used everything from Pace to fresh pico de gallo).

Brown and drain the sausage. Combine the eggs in a large bowl; break the yolks, but don't whisk the eggs together; you don't want them fully scrambled. Cook the eggs in a large skillet, breaking them into small pieces as you stir them.

Place the ingredients in the order listed. Laying a tortilla flat on a large plate, add filling ingredients until you have about 1/3 cup. Add a teaspoon or so of salsa at the end; this binds the other ingredients together and keeps the burrito from falling apart. Roll the tortilla, folding the ends in and continuting to roll after about the second length-wise fold. Enjoy!