Search This Blog

Monday, November 15, 2010

Tomato-Basil-Parmesan Soup

This recipe came to me from my friend Jennifer, who saw it in a magazine and gave it a try. She was amazed by how well it went over with her teenage boys; I was amazed at how much my family liked it, given that it has no meat in it. It's perfect for a cold night. The aroma alone makes it worth the effort.

Tomato-Basil-Parmesan Soup
2 14-ounce cans diced tomatoes, with juice
1 cup finely diced celery
1 cup finely diced carrots
4 cups chicken broth
1 cup finely diced onions
1/2 bay leaf (I took a walk on the wild side and used a whole one)
1 tablespoon fresh oregano (you can substitute 1 teaspoon of dry oregano)
1/4 cup fresh basil, finely chopped (you can substitute 1 tablespoon of dried basil, but I think you'll probably regret it)
1/2 cup butter
1/2 cup flour
1 cup parmesan cheese
2 cups half and half, warmed
1 teaspoon salt
1/4 teaspoon black pepper

In a large slow cooker, combine tomatoes, celery, carrots, chicken broth, onions, bay leaf, oregano, and basil (if you're using dried herbs, add them an hour before serving instead). Cover adn cook on low for 5 to 7 hours until flavors are blended and vegetables are soft.

About an hour before serving, prepare a roux: Melt butter over low heat in a skillet and add flour; stir constantly with a whisk for 5 to 7 minutes. Slowly stir in 1 cup of hot soup from the slow cooker. Add another 3 cups of soup and stir until smooth.

Add the soup and flour mixture back into the slow cooker. Stir and add parmesan cheese, warmed half and half, salt and pepper. Cover and cook on low for another hour until ready to serve.

This recipe has an amazing combination of flavors. Some of the kids were a little freaked out by the chunks of vegetables, though. I tried an experiment with the leftovers that made the soup more elegant: I pureed everything in the blender until it was smooth and creamy. It made for a lovely soup:

Friday, November 12, 2010

Coconut Cream Pie

I have to confess that this recipe is straight out of the Betty Crocker Cookbook. But it's a classic that we make over and over again. I justify putting it here because it's written in the BC Cookbook as a variation of banana cream pie; therefore, following the directions is always a little tricky for me.

My own finishing touch is the toasted coconut on top. Toast a few tablespoons by putting it under the broiler for a couple of minutes. Check it frequently and toss it when it starts turning light brown. Be careful; it burns quickly and then won't have the desired effect on your pie.

Coconut Cream Pie
1 pie crust, unbaked
4 large egg yolks
2/3 cup sugar
1/4 cup cornstarch
1/2 teaspoon salt
3 cups milk
2 tablespoons butter
2 teaspoons vanilla
3/4 cup flaked coconut
1 cup sweetened whipped cream (1 cup heavy cream beaten to stiff peaks with 2 teaspoons sugar)

Bake the pie crust. In a medium bowl, beat egg yolks with fork; set aside. in a 2-quart saucepan, mix sugar, cornstarch and salt. Gradually stir in milk. Cook over medium heat, stirring constantly until mixture thickens and boils. Boil and stir 1 minutes. Be sure it's really boiling when you start timing the minute. Otherwise you'll end up with a gooey mess that will taste good but not look pretty.

Immediately stir at least half of the hot mixture gradually into the egg yolks, then stir back into hot mixture in saucepan. Don't skip this step and try putting the egg yolks straight into the custard; you'll end up with little fragments of scrambled eggs in your pie, which tastes fine but, again, isn't very pretty. Ask me how I know this.

Boil and stir 1 minute; remove from heat. Stir in butter, vanilla and coconut; cool filling slightly (this is another step that I believe makes a difference in whether the pie sets up properly, although I have limited empirical evidence). Pour filling into the pie crust. Press plastic wrap on filling to prevent a tough layer from forming on top. Refrigerate at least two hours until set. Top the pie with sweetened whipped cream and toasted coconut.

Wednesday, November 10, 2010

Lo Mein

In my never-ending quest for easy meals that are also tasty, I came across this little gem. It's originally from Rachael Ray, although I've modified it just a bit here. Lo mein is without a doubt Bob's favorite Chinese entree, and he usually makes a more elaborate version. But even he gave this one a thumbs up (each of us agrees that dinner always tastes better if the other person cooked it).

I was surprised to find that the 30 minute prep time estimated in the recipe is actually pretty accurate--15 minutes for chopping and making the sauce and another 15 minutes for cooking it and putting it together. I think this was universally popular at our house, and is destined to be a regular on our menu.

Lo Mein
Sauce:
3 rounded tablespoons hoisin sauce (you'll find it in the Asian section of your grocery store)
3 tablespoons soy sauce
3 tablespoons of water
1/4 teaspoon Sriracha sauce (Sriracha sauce is a Vietnamese hot sauce. It's very hot, but I felt it should be used in this recipe because it is, afterall, Asian food. The original recipe just said hot sauce and called for 2 teaspoons. I put in 1/2 teaspoon and it was a little too hot for us. So proceed at your own risk; tabasco sauce is somewhat more mellow than Sriracha, so you might want to add a little more, depending on your tastes).

Noodles:
1 16-ounce package of spaghetti (this was one of the things I loved most about the recipe; no bewildered looks from the staff at the Asian market when I asked them what kind of noodles I needed for lo mein. I already had maybe 20 pounds of it in my basement!)
1/4 cup vegetable oil, divided
2 large eggs, beaten
3 chicken boneless, skinless chicken breasts, thinly sliced into strips
Black pepper
2 teaspoons ground coriander
2 inches fresh ginger, chopped or grated
4 cloves garlic, finely chopped
6 green onions, cut into 3-inch lengths then sliced lengthwise
1/2 pound mushrooms, chopped (the recipe calls for shitakes; we don't care for shitakes all that much so I used regular button mushrooms)
1 red bell pepper, cut into quarters, seeded, the sliced
1/2 pound shredded cabbage

Directions
Mix together sauce ingredients and reserve.

Bring pasta water to a boil, ad a little salt and cook spaghetti according to package directions.

While noodles cook, heat a tablespoon of vegetable oil in a large, nonstick skillet over high heat. WHen oil ripples, add beaten eggs and scramble them to light golden brown. Remove and reserve.

Season the meat with salt, pepper and coriander. Heat the remaining vegetable oil to a ripple, then add meat and stir-fry 4 minutes. Push meat to the side and add ginger, garlic and veggies. Stir-fry veggies 2 minutes, then drain and add pasta and eggs back intothe skillet. Pour sauce over the spaghetti and toss to combine. Turn off pan. Toss 30 seconds and let the liquids absorb.

A couple of notes: the original recipe calls for 3 thin cut pork chops, thinly sliced into strips. I think this would be delicious and would make it a heartier meal. I didn't include it in my version this time.

Also, we've found that powdered ginger works every bit as well as fresh ginger, but the fresh ginger will make your house smell great, so it might be worth the few cents and few minutes it takes to use it.

Friday, November 5, 2010

Kirkland Brand Mayonnaise

By now I'm sure you're convinced that we never shop anywhere but Costco. And you would be almost correct.

I've posted before about the  vast quantities of mayonnaise consumed at our house. Traditionally we have purchased the gallon-size Kraft brand at Costco because it was cheap. We have looked at the Best Foods brand right next to it with longing in our eyes, dreaming of the day when we would be rich and have fewer children to feed. Do we really think we'll be buying mayonnaise by the gallon when there are just two of us at home? If we do we'll have to also be buying some much bigger pants to wear.

Recently Bob spotted this dream come true in the mayonnaise aisle at Costco. It is a) of about the same quality and texture as the Best Foods brand and b) cheaper than Kraft. We are in Mayonnaise heaven.

Wednesday, November 3, 2010

Split Pea and Ham Soup

I hated split pea soup as a kid. Or I hated the idea of it. The only place I actually saw it was in the school cafeteria where it looked like something that was fairly unappetizing. It was canned. Overcooked. Pureed to death. Ugly.

As an adult, I find split pea soup comforting. It's a perfect way to use leftover ham. And while you have to start a little in advance, it's simple to put together.

I've discovered two keys to making this soup delicious instead of disgusting. First, don't cook it too long. Most recipes will tell you to leave it in the crock pot all day. Don't believe them. Four or five hours cooking on low will be plenty of time for the peas to soften. Add the vegetables even later than that, maybe one or two hours before you plan to serve the soup. Otherwise you'll get mush. I also like to add a cup or so of small diced ham a half hour or so before it's done for a little extra flavor.

Second, be sure there is enough liquid in the soup. Dry split pea soup has a heavy, mud-like texture that is hard to choke down. Well hydrated soup is a joy to eat. Trust me.

Slow Cooker Split Pea Soup

9 cups water
1 (16 ounce) package dried split peas, rinsed and sorted (2-1/4 Cups)
1 teaspoon salt
1/4 teaspoon pepper
3 medium carrots, cut into 1/4 inch slices (1-1/2 Cups)
2 stalks celery, finely chopped (1 Cup)
1 medium onion, chopped (1/2 cup)
1 ham bone or 2 lbs ham shanks or smoked pork hocks

Mix peas, ham bone and water in a five quart slow cooker. Cover and cook on low for 4 to 5 hours or until peas are starting to become tender. Add vegetables an hour or two before the soup is done. When the peas are soft, remove the ham bone and pull any cooked ham away from the bone. Add it back into the soup and serve.

Monday, November 1, 2010

Peanut Butter Cookies

My kids go crazy for peanut butter cookies. If you want to drive them really wild, put a few chocolate chips in. For years I tried to find the perfect PB cookie recipe with no success; they were dry and hard as hockey pucks. I went to my friend Kip for advice and he posted this little gem.

Chunky peanut butter works best in these cookies; for this batch I was forced to use creamy and tried dressing them up with some chopped peanuts. Next time I'll go back to the chunky stuff.

Peanut Butter Cookies

1/2 cup shortening
1/2 cup peanut butter (I like to use chunky peanut butter, but that's just a personal preference)
1/2 cup brown sugar
1/2 cup white sugar
1 egg
3/4 teaspoon baking soda dissolved in scant 1/3 cup hot water
1/2 teaspoon baking powder
1/2 teaspoon salt
1 1/2 cups flour

Cream shortening, peanut butter, and sugars. Beat in egg. Then add water and baking soda with the dry ingredients. Roll the dough into balls and bake at 350-375 degrees until done (about 12-13 minutes).

You can tell these are done when they're golden brown but still a little gooey. They'll cook a little more after you take them out of the oven. You want them slightly underdone in order to preserve the soft cookie goodnes.

Friday, October 29, 2010

Ham Stacks

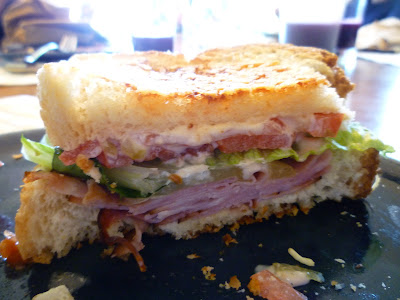
Here's another fairly simple sandwich-as-a-meal idea. It's pretty involved for a sandwich, but is robust enough for dinner (and is easy in comparison to most other evening meals). Forgive the crumbs. Somehow at the time I thought they would make the sandwich in the photo look oh-so-appetizing.

This is another idea Bob gleaned from one of the many restaurants where he has worked. You will need the following ingredients:

Sliced French bread (we usually buy it from Costco, but you could also use Texas Toast or any other thick-sliced, fluffy bread)
Softened butter (we find that magic butter is perfect for this)
A small amount of grated parmesan cheese (we use 1/2 to 3/4 cup to make sandwiches for all of us, but you may require far less)
Deli sliced ham (we buy black forest hams and slice them ourselves, but you can just as easily ask the deli to shave it for you). You'll need about 1/8th of a pound or maybe just a little more per sandwich; I actually weigh it out on our kitchen scale and measure about 2/10ths of a pound per sandwich
Sliced Swiss cheese
Sliced tomatoes
Clean, torn lettuce leaves
Homemade thousand island dressing

You'll find that the method for making this sandwich has many similarities to our BFB recipe.

1. Butter one side of each slice of bread. It probably goes without saying, but you'll want two slices per sandwich. Sprinkle a bit of grated parmesan cheese on top of the butter and press it into the butter so it will stick (I use the back side of a small metal spatula to do it). For an example of what this should look like, see here. Set the bread aside for a few minutes.

2. Put the ham into small "stacks" or piles, portioned for each sandwich. Set the stacks aside.

3. Put the bread slices cheese side down on a hot griddle (I usually set it at 350 degrees). Let them cook for 2-3 minutes or until golden brown. Remove from the griddle and set aside.

4. Put the ham stacks on the griddle and let them cook until they turn ever so slightly brown. Then flip them over (keeping the stacks intact) and place a slice of Swiss cheese on top. The cheese should more or less cover the ham. Leave on the griddle until the cheese has melted, then carefully remove, keeping the ham and cheese in their "stack" formation.

5. Assemble the sandwiches. The cheesy side of the bread goes to the outside; place the ham on the inside of one slice of bread and the lettuce and tomato on the other side. Drizzle with homemade thousand island dressing (see below).

Don't be intimidated by the homemade dressing. It takes no more than five minutes to make, and includes ingredients that you are almost certain to have in the fridge. We usually put all of the makings on the counter and let everyone make their own. Here's the dressing recipe:

Thousand Island Dressing

1/2 cup mayonnaise
2 tablespoons ketchup
1 tablespoon white vinegar
2 teaspoons sugar
2 teaspoons sweet pickle relish
1 teaspoon finely minced white onions
1/8 teaspoon salt
1 dash black pepper

Combine all of the ingredients in a small bowl. Stir well. Place dressing in a covered container and refrigerate for several hours, stirring occasionally so that the sugar dissolves and the flavors blend.

Wednesday, October 27, 2010

Roasted Broccoli

I never thought that I would find a brocoli dish that my kids can't get enough of. But this is it. No matter how much of it I make, they're always left wanting more.

Part of the problem is that the broccoli shrinks up quite a bit. I start out with what seems like ridiculous amounts of florets and by the time they're cooked, it looks like almost nothing. So think big. You'll love this side dish.

Roasted Broccoli
A great deal of broccoli florets (I, of course, buy the large bag from Costco and use as much as 1/3 of the bag at a sitting)
A little bit of olive oil (2-3 tablespoons for a large amount of broccoli; go slowly. You don't want to over do the olive oil or it will make your final product mushy).
Whatever herbs or spices you feel inclined to add. I usually add about a clove of minced garlic and some salt and pepper.
2-3 tablespoons of grated parmesan cheese

Preheat the oven to 400 degrees. Drizzle the olive oil over the broccoli in a large bowl. Toss with the seasonings until the broccoli is evenly coated with oil and seasonings. Spread out evenly on a baking sheet. Bake for ten minutes, then remove from the office and toss again. Return to the oven for another ten minutes, or until the broccoli is slightly browned. It should be a little bit crisp. Remove from the oven and immediately sprinkle with grated parmesan; serve it while it's hot.

Monday, October 25, 2010

Pasta Carbonara

A disclaimer: This is not the pasta carbonara I learned to make in Italy. That pasta carbonara was basically scrambled eggs and bacon over pasta. Don't get me wrong; it still has a special place in my heart. This version, a recipe I learned from Bob, is a fancier and more indulgent sister. It's a family favorite. It's rich enough to just be an occasional treat, but it's delicious enough that you'll want to make it again and again.

Did I mention that it's also pretty easy to put together?

Pasta Carbonara
8 slices of bacon, diced
1 bunch of green onions, sliced
½ pound of mushrooms (12), quartered
1 package of spaghetti noodles (8 servings)
1 pint of heavy cream
1 cup grated parmesan
1 cup grated mozzarella cheese

Cook the spaghetti according to package directions. Cook the bacon until crisp; drain. Add the green onion slices and mushrooms and sauté into butter (we usually reserve a few green onion slices for a garnish). Add heavy cream, parmesan, salt and pepper to taste. Cook until thick. Toss the drained noodles in the carbonara sauce. Top with a little grated parmesan and sliced green onions.Serves 8.

Sunday, October 10, 2010

Salsa with an Edge

There's snow on the top of our tallest local mountain tonight. We know that our warm fall won't last long, and the tomatoes will freeze any day now. Here's a recipe for one last gasp of good weather. I found it a few years ago in Cooking Light magazine. It's a fun combination of flavors, even if it does require remarkable amounts of chopping.

I've made this with any number of different fruits. Peaches are very tasty, but a little sloppy. Apples add a nice crunch and are oh-so-very tidy. This is a salsa with a little bit of everything--sweet, savory, hot, you name it. It's great with Fritos or tortilla chips.

Salsa With and Edge
2-3 chopped Roma tomatoes
1 cup chopped Granny Smith apples (or use mangoes, pears, peaches, or other fruit)
1/2 cup chopped cucumber
1/2 cup fresh corn kernals
1/2 cup chopped red pepper
1/4 cup chopped green onions
1/4 cup chopped red onion
2 1/2 tablespoons fresh chopped cilantro
1 1/2 tablespoons fresh lime juice
1 tablespoon chopped, seeded jalapeno pepper
1 tablespoon balsamic vinegar
1 1/2 teaspoon sugar
3/4 teaspoon salt
1/2 teaspoon freshly ground black pepper

Combine all ingredients, stirring well to combine. Serve at room temperature or chilled. Makes 4 1/2 cups.

Thursday, October 7, 2010

Chicken Bow Tie Pasta Salad

You won't believe how good this salad tastes. My friend Amy brought some by one day for me to try. It was heavenly! Bob and I opened it for just a taste late that night; I was planning to take it to work for lunch the next day. By the time we finished tasting, the salad was half gone. I've made it several times since.

This recipe makes enough for a crowd. We served it at a recent family party and it was a huge hit. We actually enjoyed two very similar versions at two family parties in a row. My aunt made a salad very similar to this for my mom's 80th birthday party, but omitted the chicken and substituted the almonds with cashews. Both version left people wanting more.

Chicken Bow Tie Pasta Salad

4 cups diced chicken
2 Tablespoons green onion
¾ teaspoon pepper
2 cups bowtie pasta
1 8 oz. bottle Kraft Cole slaw dressing
1 cup mayonnaise
Dash of thyme
Pinch of ginger
Mix the above ingredients and refrigerate overnight or move on to the next step immediately.

Add:
1 cup diced celery
2 cups halved red grapes
1 20-ounce can pineapple tidbits, drained
2 cups apples, diced (Amy recommends one golden delicious apple and one Fuji apple)
¾ cup slivered almonds

Toss lightly and serve. This recipe makes a large quantity, but it also holds up very well for several days.

Monday, October 4, 2010

Ginger Cookies

To me this is a perfect fall cookie recipe. The spice reminds me of harvest time somehow, and even the color is right for the season. This recipe comes from my friend Kip (see here), and as his headline suggests, they are big and soft. They have a lovely ginger snap flavor, but are much more luxurious to eat.

Big Soft Ginger Cookies

2 ¼ cups all-purpose flour
2 teaspoons ground ginger
1 teaspoon baking soda
¾ teaspoon ground cinnamon
½ teaspoon ground cloves
¼ teaspoon salt
¾ cup margarine, softened
1 cup white sugar
1 egg
1 tablespoon water
¼ cup molasses
2 tablespoons white sugar

Preheat oven to 350 degrees. Sift together the flour, ginger, baking soda, cinnamon, cloves, and salt. Set aside. In a large bowl, cream together the margarine and 1 cup sugar until light and fluffy. Beat in the egg, then stir in the water and molasses. Gradually stir the sifted ingredients into the molasses mixture. Shape dough into walnut-sized balls, and roll them in the remaining 2 tablespoons sugar. Place the cookies 2 inches apart onto an ungreased cookie sheet, and flatten slightly. Bake for 8 to 10 minutes in the preheated oven.

Allow cookies to cool on baking sheet for 5 minutes before removing to a wire rack to cool completely. Store in an airtight container. Yields approximately 24 cookies.

Saturday, October 2, 2010

Clam Spaghetti

I am not exaggerating when I tell you that putting this dish together is easier than opening a bottle of Ragu.

This pasta dish has a very light flavor (except for the somewhat copious amounts of garlic). It's a lighter pasta than either red sauces or cream sauces--just perfect for the end of a busy day.

Clam Spaghetti

2 Tablespoons butter
3 cloves garlic
1/2 cup chopped onion
1/2 teaspoon salt
dash pepper
2 six-ounce cans minced clams, undrained
1/2 cup white wine
1/2 cup grated parmesan cheese
8 ounces spaghetti, cooked and drained

Melt the butter in a large frying pan. Add onion; saute until it's transparent. Add the garlic and saute until it turns brown (but before it turns bitter). Add salt and pepper. Add clams and white wine; simmer for 4-5 minutes. Toss with hot spaghetti and top with parmesand cheese.

Thursday, September 30, 2010

Spinach Artichoke Dip

This is a crowd-pleasing appetizer that we've discovered just in the last few months. It's very easy to make, which is a good thing because it will get scarfed up quickly. The recipe is originally from one of those Betty Crocker cook book pamphlets that you pick up on your way through the grocery check out; I used to do a lot of work at General Mills and acquired a large collection of them that way. The original recipe called for a little crab added to the recipe. I forgot about the crab the first time I made it and didn't miss it, so I haven't added it since. The original recipe also called for frozen spinach (a ten-ounce box). I am much more likely to have fresh spinach on hand than frozen, so I just put in a few handfuls of fresh spinach until the colors (spinach vs. artichoke) look balanced.

Spinach Artichoke Dip
1 cup mayonnaise
1 cup freshly grated parmesan cheese
1 can (14 ounces) artichoke hearts, drained and coarsely chopped
2-3 cups fresh spinach
1 cup shredded Monterey Jack or Cheddar cheese (I think I usually use a combination of the two)

Heat oven to 350 degrees. Mix mayonnaise and parmesan cheese in a medium bowl. Stir in artichoke hearts and spinach. Stir in most of the remaining cheese, reserving a little bit to sprinkle on top as a garnish.

Spoon into a medium-sized baking dish (about 1 quart). Sprinkle with the remaining cheese. Bake for 15-20 minutes or until cheese is melted.

We've tried eating this with a variety of crackers, chips, etc. I think our hands down favorite is some lightly toasted baguette slices.

Sunday, September 12, 2010

Jearlene's Brownies


Of all of our many brownie recipes, this is a favorite standard. It's full of chocolatey goodness. We usually frost these, but left them unfrosted in this photo because we were (of course) topping them with vanilla ice cream and chocolate syrup. And we do have our limits.

This recipe came to us from my childhood friend, Jearlene.

Jearlene’s Brownies


1 c. butter or margarine
¾ c. cocoa
4 eggs, beaten
2 c. sugar
1 t. vanilla
1 1/3 c. flour
1 t. baking powder
½ t. salt

In large saucepan, melt butter. Remove from heat and stir in cocoa until smooth. Blend in eggs, sugar and vanilla. Stir in dry ingredients; mix well. Bake in greased 13” x 9” pan at 350 degrees for 32 to 35 minutes until done.

Frosting

¼ c. butter
1 t. vanilla
2-3 c. powdered sugar
5 T. cocoa
¼ c. milk

Blend butter, vanilla, sugar, cocoa and milk until smooth. Spread over hot brownies. Cool and serve.

Friday, September 10, 2010

Yummy Spice Cake

There's nothing like a spice cake for comfort. After looking high and low, and adapting here and there, we've finally settled on this recipe as a favorite. It's rich and moist and just says "home." As an added bonus, it's awfully easy to make. But remember, I never said it was healthy!

Yummy Spice Cake
2 cups flour
1 cup white sugar
1 cup brown sugar
2 teaspoons baking soda
1/2 teaspoon salt
1/2 teaspoon cinnamon
1/4 teaspoon nutmeg
1/2 teaspoon vanilla
1 20-ounce can crushed pineapple
1 cup chopped walnuts

Preheat oven to 350 degrees. Combine all ingredients, including the pineapple juice, and mix thoroughly. Pour into a greased and floured 9 x 13-inch baking dish. Bake for 30-35 minutes. Let cool completely and frost with cream cheese frosting.

Cream Cheese Frosting
1 8-ounce package of cream cheese, softened
1 cube butter, softened
1 teaspoon vanilla
2 cups powdered sugar

Combine all ingredients together and beat with a mixer unto smooth and creamy.

Wednesday, September 8, 2010

Artisan Bread in Five Minutes a Day


This post is really more of a pitch for a new favorite cookbook than it is a recipe. But I'll include a recipe below.

A few months ago our friends Steve and Laura stopped by late one evening. They brought with them the most stunning loaf of bread. They related how some friends had taught them to make the bread using the book, Artisan Bread in Five Minutes a Day.

Being the frugal and conservative soul that I am, I found the book at the library and tried it out. It was instant love. Our family loves homemade bread, and we have long dreamed of making the kind of bread you find in Italian bakeries. This book proved just the ticket.

I've settled into a couple of favorite recipes, although I'm sure I'll eventually try others. For the most part, this book lives up to its title: you can mix up the bread, let it raise for a couple of hours, and then either bake it immediately or store it in the fridge for use a few days later. Or, since the recipe makes a large quantity even by our family's standards, you can do both. I often make an initial batch on Sunday and then bake the rest later in the week. Here's what the pre-baked product looks like:

And yes, having a pizza peel and a pizza stone really helps.

To be clear, I ordered the book through Amazon not long after it was due at the library. The recipe below is for peasant bread. In the book it's listed as roasted garlic potato bread; I made it with roasted garlic the first time, but wasn't awed by the results. Now I make it without and (gasp!) use instant potatoes. 

 Roasted Garlic Potato Bread
From Artisan Bread in Five Minutes a Day
By Jeff Hertzberg and Zoe Francois

3 cups lukewarm water
1 1/2 tablespoons granulated yeast
1 1/2 tablespoons Kosher salt
1 1/2 tablespoons sugar
1 cup mashed potato
6 1/2 cups unbleached all-purpose flour (I confess that I usually use the pure white stuff)
Cornmeal for the pizza peel

1. Mix the yeast, salt, sugar and mashed potatoes with the water in a 5-quart bowl or a lidded (not airtight) food container.

2. Mix in the flour without kneading, using a spoon or a 14-cup capacity food processor with dough attachment, or a heavy-duty stand mixer (with dough hook). If you're not using a machine, you may need to use wet hands to incorporate the last bit of flour.

3. Cover (not airtight), and allow to rest at room temperature until the dough rises and collapses or flattens on top, approximately 2 hours.

4. The dough can be used immediately after the initial rise, though it is easier to handle when cold. Refrigerate in a lidded (not airtight) container and use over the next 7 days.

5. On baking day, dust the surface of the refrigerated dough with flour and cut off a 1-pound (grapefruit size) piece. Dust the piece with more flour adn quickly shape it into a ball by stretching the surface of the dough around to the bottom on all four sides, rotating the ball a quarter-turn as you go. Allow to rest and rise on a cornmeal-covered pizza peel for 1 hour (or just 40 minutes if you're using fresh, un-refrigerated dough).

6. Twenty minutes before baking time, pre-heat the oven to 450 degrees with a baking stone placed on the middle rack of the oven. Place a broiler tray for water on any other shelf that won't interfere with the rising bread.

7. Sprinkle the loaf liberally with flour and slash a cross, "scallop," or tic-tac-toe pattern into the top, using a serrated bread knife. Leave the flour in place for baking; tap some of it off before eating.

8. Slide the loaf directly onto the hot stone. Pour 1 cup of hot tap water into the broiler tray, and quickly close the oven door. Bake for 30 to 35 minutes or until deeply brown and firm. Smaller or larger loaves will require adjustments in baking time.

Allow to cool before slicing or eating.

Monday, September 6, 2010

Chunky Blonde Brownies


We're big brownie fans. Not necessarily because we like our brownies large (although, truth be told, that's probably more right than wrong). But we like brownies of all kinds. When we want to mix things up a little bit we try these blonde brownies as an alternative to classic chocolate brownies.  Even Bob, who claims not to like blonde brownies, likes these.

I think the recipe is originally from Taste of Home. I found it on a now-unknown website and have modified it slightly based on the ingredients we tend to have on hand. I've found that this recipe is especially popular with kids, but everyone likes it with vanilla ice cream on top.

Chunky Blonde Brownies
Makes about 24 brownies, unless you cut them very large

1/2 cup butter or margarine, softened
3/4 cup sugar
3/4 cup brown sugar, packed
2 eggs
2 teaspoons vanilla extract
1 1/2 cups flour
1 teaspoon baking powder
1/2 teaspoon salt
1 cup white chocolate chips
1 cup semi-sweet chocolate chips
1/2 - 1 cup chopped walnuts

Pre-heat oven to 350 degrees. Cream butter and sugars in a mixing bowl. Add the eggs and vanilla; mix well. Combine the flour, baking powder and salt; add to the butter and sugar mixture and blend well.

Stir in the white chocolate chips, semi-sweet chips and the nuts. Spoon into a greased 13 x 9 inch pan and spread evenly over the bottom. Sprinkle with any remaining nuts.

Bake at 350 degrees for 25-30 minutes or until golden brown. Cool on a wire rack.

Monday, August 23, 2010

Veggie Lasagna

This recipe was a gift from my friend Jen. And I really mean that. I had heard her talk about her love for veggie lasagna for a few years and finally mustered the courage to ask her for the recipe. The result has been true love.

At least it has been for a little more than half of our family. We usually only make this during the summer because that's when all of the required vegetables are growing in our back yard (okay, at least many of them). Several of our children say they perfer this version of lasagna to its more traditional sister. The rest of the kids like it well enough to eat it without complaining.

I've found that you can mix up the combination of vegetables quite a bit. For example, you'll notice that the photo above shows off the spinach I included. If I don't have spinach, I leave it out (although including it is my preferance). It's also prettier with summer squash and zucchini because of the color differences (the same is true for multi-colored peppers). But I've also made it with whatever I happened to have on hand and it's delicious.

Vegetable Lasagna

2 medium bell peppers, thinly sliced
2 medium zucchini sliced (I have sliced them both lengthwise and cross wise. I am still undecided about which method I prefer).
1 medium onion sliced
½ pound mushrooms cleaned and sliced
1-2 tablespoons olive oil
1 teaspoon dried basil
1 teaspoon dried oregano
1 teaspoon dried rosemary
1 teaspoon dried parsley
Freshly ground pepper to taste
9 lasagna noodles
1-2 cups grated mozzarella cheese
Parmesan cheese
1 jar spaghetti sauce ( Jen always uses Prego Italian sausage; I use whatever is stockpiled in my basement that was on sale for $1, usually Ragu traditional. It is sacreligious, I know, but I also sometimes sneak in about 1/2 pound of cooked sausage).

For the veggies: Preheat oven to 425 degrees. Put cut vegetables in a large bowl. Use olive oil, salt, seasonings, pepper and salt. Mix until the vegetables are lightly and evenly coated. Spray a jelly roll pan with cooking spray and spread veggies on it evenly. Bake for a total of 20 minutes (I usually take them out at the ten minute mark to toss them for more even roasting.

While veggies are in the oven, cook the noodles according to package directions. Reduce oven to 400 degrees. Spread a bit of the sauce on the bottom of pan then layer noodles, sauce, veggies, cheese. You will end up with three layers. Bake uncovered at 400 for 20-25 minutes. Let stand for 10 before cutting.

Friday, July 30, 2010

Pasta Salad

I think it's fair to say that this photo doesn't do the salad justice. But use your imagination.

I invented this salad back in my older single days. It was great for potlucks and other social gatherings. It's evolved under Bob's influence. I believe I used to use chicken; it tastes much better with ham. And I'm now not allowed to make it without sufficient amounts of red onion.

This is another very quick and easy meal that's easy to whip up after work. It's also a lovely side dish. You aren't required to use the colored rotini, although we always do (another Bob innovation) because it's much prettier that way.

I was originally pretty fastidious about using only Bernstein's Cheese Fantastico as the dressing. But these days I use whatever Italian dressing is on the pantry shelf or on the fridge, and it seems to work out just fine. Our family loves this, and it really couldn't be any easier. It's a great use of leftover ham. We also often use relatively thick-sliced packaged ham.

Pasta Salad


1 15-oz. package of multi-colored or plain pasta
2 cups diced ham
1 ½ cups diced cheddar cheese
1 ½ cups frozen corn
1 ½ cups frozen peas
½ cup minced red onion

Cook pasta according to package directions. Drain, rinse and cool. Combine other ingredients in a large bowl. Add pasta and stir until mixed. Mix 1 ½ cups mayonnaise with ½ cup Bernstein’s Cheese Fantastico salad dressing to make dressing; pour over salad mixture and blend until evenly covered.

Wednesday, July 28, 2010

Everyone Should Have a Pizza Stone

This photo won't win any beauty contests. But it shows off one of my favorite household products, the pizza stone. We first received a pizza stone as a wedding gift from my brother and his wife. We put it away in the closet for several years until some friends came over to teach us how to make homemade pizza. We've been using it ever since. Truth be told, we broke the original model years ago.

Used correctly, the stone gets uglier with age. It works much better after you've cooked on it quite a lot. Cooking items with a relatively high fat content darkens (or seasons it) even faster. On one of our new pizza stones we baked several batches of chocolate chip cookies. While it was admittedly better for the stone than for the cookies, it speeded up the seasoning process considerably. We weren't all that sorry about enduring the crispy cookies.

The purpose of the stone is to crisp up the crust. To call this a pizza stone is a little bit limiting. We actually bake all kinds of items on it. It's especially good for artisan breads. Place hand made loaves on the stone, pour a cup of water in a heated pan on the bottom shelf of the oven, and you're bound to pull out crispy, beautiful loaves.

We haven't found pizza stones all that easy to locate. Our local grocery store carried them for awhile; Bed Bath and Beyond is usually a sure bet.

Monday, July 26, 2010

Triple Chocolate Bundt Cake

This recipe has been making its way around my neighborhood for a couple of years now. It's a chocolate cousin of the lemon pound cake recipe I posted not quite a year ago. It's extremely rich, but also extremely yummy.

It's also quite easy. It starts with a box cake; use Devil's food. I tried plain chocolate once, and for some reason it made the cake taste like paste (unfortunately the experiment was on my daughter's birthday cake). The other two chocolate sources are chocolate chips (semi-sweet) and chocolate pudding (instant). For this photo, I topped the cake with a super rich (and apparently super shiny) ganache, which is a combination of heated whole cream and melted semi-sweet chocolate chips.

One secret if you're new to Bundt cake making: grease and flour your pan very thoroughly, or the cake will break up when you take it out of the pan. And half the fun of this cake is that it looks just smashing.

Triple Chocolate Bundt Cake
1 Devil's food cake mix
1 4-oz. package instant chocolate fudge pudding
4 large eggs
1/2 cup warm water
1/2 cup vegetable oil
1 cup sour cream
1 cup semi-sweet chocolate chips

Pre-heat oven to 350 degrees. Blend all of the ingredients together, except for the chocolate chips. Beat for four minutes with an electric mixer on medium speed. Stir in chocolate chips by hand until evenly distributed in teh batter. Pour into a 12-inch Bundt pan that has been thoroughly greased and floured. Bake for 50-60 minutes or until an inserted toothpick comes out dry. Cool for 15 minutes before removing from pan.

There are many ways to finish this cake - dust it with powdered sugar, make a powdered sugar glaze, or make the aforementioned ganache. I also once tried making a ganache with white chocolate chips; it was perhaps my favorite topping ever.

Monday, July 12, 2010

Honey and Black Pepper Beef

True confessions: I recently started a new job. After working from home for seven years, I'm back in the office from 9 to 5 (well, actually 7:30 to 4:00 or maybe a little later). The first week I worked, dinner times were, shall we say, highly informal at our house. But last week I realized that I really missed cooking dinner every night. More than that, I miss having everyone around the table for at least one meal a day. I convinced myself that I could find meals simple and fast enough that I could make them, even in my post-work state. And you know what? I was right.

This recipe comes from one of my new favorite cookbooks, Homestyle Asian. It honestly took me somewhat less than 30 minutes to put it together (okay, I have to admit that Bob cut the meat up before I got home). It was delicious. We served it over jasmine rice. There were no side dishes, but perhaps we'll work up to that in the coming weeks.

We made a number of revisions from the original recipe. The book calls for 2 pounds of round steak. Bob found some boneless ribeyes on sale that were heavenly; we used two of them, cut into strips. I think any cut of beef that doesn't require long cooking times to become tender would work. I couldn't see our bunch eating snow peas, although that was part of what initially attracted me to the recipe. So I used broccoli, which looked and tasted great. I also put in some red bell pepper strips for color. As a bonus, they also added great flavor. I think my favorite part was the sauce--some sweetness from the honey, some heat from the pepper and some soy to tie it all together.

Honey and Black Pepper Beef
1-2 tablespoons of vegetable oil
2 pounds round steak, cut into thin strips
1 large onion, sliced
1 pound or so of trimmed broccoli florets
1/2 red bell pepper, thinly sliced
1/4 cup honey
1/4 cup soy sauce
1/4 cup oyster sauce
1 teaspoon freshly ground black pepper

Heat the wok until very hot. Add 1 tablespoon of the oil and swirl it around to coat the side. Stir-fry the beef in batches over high heat. Remove and drain on paper towels.

Reheat the wok and add 1 tablespoon of the oil and stir fry the garlic, onion, broccoli and peppers until softened. Remove from the wok and set aside.

Add the honey, soy sauce, oyster sauce and black pepper to the wok. Bring to a boil, then reduce the heat and simmer for 3-4 minutes or until the sauce thickens slightly.

Increase the heat, return the meat and vegetables to the wok, and toss for 2-3 minutes or until well combined and heated through.

Friday, July 9, 2010

Homestyle Asian Cookbook

I am well aware that we are supposed to be getting rid of some of our cookbooks. But this one was a gift, and we truly love it.

We invited one of our neighbors and her mother to come over for cooking class. This is the same neighbor who taught us how to make eggrolls. This time she (and her mother) taught us how to make chicken adobo and other wonderful Filipino dishes. To thank us for letting her slave away in our kitchen, the mother (who was here on a supposed vacation from Iowa) sent us this book. I can't tell you where to buy it; I can't find it anywhere, even on the internet. But if you can ever come up with a copy, you will be glad you did.

As the title suggests, the meals included are homestyle. They're things that an average Asian family might eat for dinner. We love the range of cuisines covered in the book. There are recipes from India. Thailand. Singapore. And of course your average Chinese and Japanese dishes as well. They are organized by type of food (soup, appetizers, salads, etc.) rather than by country, which I like. There are beautiful photos of every dish, and for those of you with an international perspective, measurements are given in both metric and English units.

If I have one criticism of the book, it's that it doesn't tell a story about every recipe (and I obviously like stories about recipes). But that particular characteristic makes it more homey for me; it's unpretentious and straightforward. These are meals you should make at home. The publisher is Bay Books. I hope you can find it.

Tuesday, July 6, 2010

Chicken and 40 Cloves of Garlic

And now just to prove that we do sometimes still use whole garlic cloves, here's one of the most garlic-rich recipes I know. That may not look like 40 cloves of garlic, but it's actually about 47 or 48 cloves. I doubled this recipe, but refrained from doubling the number of garlic cloves because I wanted to be sure that the neighbor kids would still play with my children. Did you know that consuming large amounts of garlic will cause it to seep through your pores in odor form? Try getting on a crowded public bus in a country where garlic is included in every meal and you'll see what I mean.

I'm not sure of the origins of this recipe, but I think it's French. I've seen many different versions. I'm almost certain I've seen one that calls for a whole chicken cooked in a crock pot (with, of course, the 40-odd cloves). It's a lovely, simple meal. Bob and I have searched for a great garlic chicken recipe since I took him to Mr. B's restaurant in New Orleans six or so years ago. At the time, he couldn't believe that I was ordering chicken at a world-class restaurant (I had been there before on business trips). But after he tasted it, he was won over and has been a raving garlic chicken fan ever since. I can't say this even comes close to Mr. B's, but it has a wonderful flavor and is relatively easy to whip up. Here's what the dish looks like after it's finished:


Chicken With 40 Cloves of Garlic
6 boneless, skinless chicken breasts, trimmed of any fat
1-2 tablespoons olive oil
1-2 teaspoons dried thyme
1 teaspoon sea salt
1/2 teaspoon fresh cracked pepper
40 cloves of garlic, separated and peeled
1 tablespoon of butter
1 tablespoon of flour
3 cups chicken broth
2 tablespoons milk
1 tablespoon fresh parsley, chopped (I didn't have any parsley on hand, so I omitted it. It is, after all, a garnish).

Preheat the oven to 350 degrees. Place trimmed and halved chicken breasts in a large zip loc bag. Pound the meat flat with a mallet until it is about 1/2 inch thick. Season with sea salt, black pepper and thyme to taste (the fresh thyme in our garden is going crazy, so I substituted it for the dry. It was lovely).

Heat the olive oil in a large skillet over medium high heat. In batches, saute the chicken smooth side down first until nicely browned, about 4 minutes. Flip the breasts and cook for 45 seconds, then remove to a baking dish. Once all the chicken has been cooked, add the garlic to the skillet. Lower the heat and saute for 3-4 minutes, turning often. Add the chicken stock, making sure to scrape all the brown goodies off the bottom of the pan. Season with salt, pepper and thyme if needed. Pour the sauce over the chicken in the baking dish. Cover with a lid or foil and bake for 20 minutes.

Once the chicken has baked, carefully remove the meat and garlic cloves to a platter and cover with an aluminum foil tent to keep it warm. Place the sauce in the large skillet used to cook the meat. In a small bowl, whisk together the flour and milk with a little bit of the sauce. Once it's thoroughly mixed, slowly whisk the flour mixture back into the rest of the sauce. Add the butter to the sauce, increase the heat and boil for three minutes or until it's nice and thick. Taste and re-season if needed. Pour the sauce over the chicken, garnish with fresh chopped parsley and serve.

Monday, June 28, 2010

Minced Garlic


From time to time, we have been garlic snobs. One year, with the help of a friend, we even planted and grew our own garlic. It was delicious. But it took work. We still use fresh garlic sometimes, such as when I make and bottle pizza sauce every summer. But we have embraced so many garlic-intensive dishes that we've seen the light: we now stock minced garlic from (where else?) Costco.

We aren't at all attached to this brand, and I know that you can buy smaller containers at your average grocery store. Truth be told, we discarded a number of containers of this garlic before they were completely consumed because we felt that they had passed their prime. But in recent months we have been polishing it off without a problem.

This works really well for garlic-intensive recipes as you might find in Vietnamese food (see here and here). We also use it for recipes requiring a much smaller amount. We love being able to use garlic to our hearts' delight without all that peeling and crushing.

Friday, June 18, 2010

Cooked Carrots


For the past several years we have been on a quest to effectively cook carrots. We've eaten delectable carrots at parties, restaurants and family gatherings. We've eaten them glazed. We've eaten them buttered. We've tried any number of recipes that have fallen just a little bit short of our dream.

This weekend I discovered the secret of perfect cooked carrots. Perhaps all of you already know these secrets, but in case you don't, I'll let you in:

1. Cook the carrots in a little bit of chicken broth and
2. Don't cook them for very long.

The children were singing and dancing as they ate these carrots, even the ones who habitually avoid vegetables. Here's the complete recipe:

Cooked Carrots
1 pound peeled, sliced carrots (as you can see, I resorted to baby carrots)
1/2 cup chicken stock
3 tablespoons butter
2 tablespoons sugar (I used brown sugar, but I'm sure white sugar would also work)
Salt and pepper to taste

Cook the carrots in a sauce pan with the chicken stock and salt over medium heat until tender crisp. You only need about 7 or 8 minutes. You should be able to stab them with a fork, but just barely.

Drain off the chicken stock. Add the butter and sugar and simmer until the carrots are lightly glazed.

Note: I haven't tried the carrots without the sugar yet, but I'm betting that they would be delicious simply buttered after they have been cooked in the chicken broth.

Wednesday, June 16, 2010

Rice Pilaf

We arrived home from a vacation at the beach late Saturday night. I went through most of the day Sunday believing that we had ten pounds of russet potatoes in our pantry that would make a perfect baked potato complement to our roast chicken dinner (no, not even our family goes through an entire 10 pounds at one sitting). When I came to the realization that we in fact lacked potatoes, I made a double batch of this rice pilaf. We've used this recipe for the past several  years. It's a family favorite, and goes well with chicken, fish, or almost any other kind of meat. It dresses up the rice just enough to make it a standalone side dish.

I think the original recipe calls for either orzo pasta or spaghetti broken into 1/4-inch to 1/2-inch lengths. Someday I will use orzo; it's prettier than broken spaghetti, but we never have it on hand. We always have spaghetti, and Jenny and Anna are well trained in the art of breaking it into tiny pieces.

Rice Pilaf
2 tablespoons butter
1 onion, chopped
1/4 cup orzo pasta or spaghetti broken into small pieces
3 cups chicken broth
1 cup long grain rice

Melt the butter in a large sauce pan. Add the onion and saute until it is clear. Add the pasta and cook with the onions and butter on medium heat until the pasta is evenly browned. Stir in the rice and continue cooking until the grains look clear. Add the chicken broth, cover and bring to a boil. Reduce the heat to its lowest setting and continue cooking, covered, for 30 minutes or until almost all of the liquid is absorbed. Place two paper towels beneath the lid and let the rice cook on low heat for another 15 minutes.

Thursday, June 10, 2010

BFBs


What is a BFB, you may ask. This is a family original, or perhaps I should say a family indulgence. It even looks good despite being poorly stage on the floral Corelleware. A BFB is a Big Fancy Burger. I don't remember whether we held an official contest for the name, or if it just evolved and BFB just seemed right. Recently we have considered renaming it the BSB (Big Sloppy Burger) or BMB (Big Messy Burger).

This is actually more of a meal idea than a recipe. There are just a few critical elements. First, use sourdough bread instead of a bun. Lightly butter the bread. Sprinkle and press grated parmesan cheese on the bread. It should look like this:


Then toast the bread on a griddle until it is golden, like this:


We use the sourdough loaves from Costco. You could also buy the square loaves from other stores, but the slices are quite large, so you would probably want to cut them in half. And of course pre-formed, frozen hamburger patties are a bit of an odd-size for this sandwich, so we usually form our own, adding salt and pepper:

The garnishes you add to the burger are really up to you. We usually make them into cheese burgers, and then offer lettuce, pickles (Claussen are our preferred brand), tomatoes, onions and (when we are being lavish) avocados or even bacon. However one of the key secret ingredients is homemade Thousand Island dressing, the recipe for which you will find below. Ketchup and mustard are definitely no-nos on this burger. Trust me. You'll like them better with special sauce.

Thousand Island Dressing
1/2 cup mayonnaise
2 tablespoons ketchup
1 tablespoon white vinegar
2 teaspoons sugar
2 teaspoons sweet pickle relish
1 teaspoon finely minced white onions
1/8 teaspoon salt
1 dash black pepper

Combine all of the ingredients in a small bowl. Stir well. Place dressing in a covered container and refrigerate for several hours, stirring occasionally so that the sugar dissolves and the flavors blend.

Quantity note: We make a lot of burgers at one time. We have never used all of the dressing made by this recipe. So make them again soon to use the rest, or use it as a salad dressing.

Monday, June 7, 2010

Chinese Chicken Salad

This recipe has been in my cookbook for a long time. I recently developed a hankering for it, and ended up modifying it slightly from the way I made it decades ago. Its distinguishing characteristic is the addition of ramen noodles--not too surprising, given that I acquired the recipe during my college years. The salad has a lovely Asian flavor and a wonderful variety of crunchies.

One modification I made to this recipe was to cook the chicken in much the same way I do for other Asian salads (see here and here). How can something with this much sugar be bad?

Chinese Chicken Salad
1 large or 2 medium chicken breasts
2 cups water
1 head cabbage, finely chopped
4 green onions, finely chopped
1 package chicken flavored ramen noodles, broken up (save the flavoring packet)
1/2 medium-sized green pepper, finely chopped
2 Tablespoons sesame seeds
1/2 cup sliced almonds

Cook the chicken in the teriyaki sauce and water over medium heat for 30-45 minutes until they are easily shredded. Shred into small pieces.

Combine all of the vegetables, the ramen and the chicken in a large bowl. Add the sesame seeds and almonds. Toss with the dressing and chill one hour before serving.

Dressing
2 tablespoons sugar
3 tablespoons rice vinegar
1/2 teaspoon pepper
1 teaspoon salt
1/3 cup vegetable oil
ramen flavoring packet

Mix all ingredients thoroughly. Pour over salad.

Friday, June 4, 2010

Onion Straws

I mentioned onion straws in a post about steak and blue salad a couple of months ago. At long last, here's the (very simple) recipe. We made them a few nights ago for a lovely steak salad that we made with some leftover grilled tri tip. It was delicious. I can assure you, however, that our kids like the onions equally well as a simple side dish. The same recipe also works well for deep fried zucchini; it's light and more like a tempura batter than a standard onion ring recipe.

This recipe makes enough to batter one large onion. We actually even battered a medium-size zucchini with the leftover batter. We used a sweet onion this time, but have used regular yellow onions with great success.

Onion Straws
1 large onion, julienned
3/4 cup cornstarch
1/4 cup flour
1 teaspoon baking powder
1 1/2 teaspoons salt
1/2 teaspoon black pepper
1/2 teaspoon granulated garlic
1/2 cup water
1 egg, beaten

In a medium mixing bowl, combine all of the ingredients until you have a smooth batter. Stir in the onion slices and cover thoroughly. Drain slightly (I hold the onions over the bowl with tongs for a few seconds while they drip a bit), then fry in 1/2 inch of hot oil until golden brown. I usually turn them over half way through the cooking process.

Use as a side dish, or as a topping for salad.

Wednesday, May 5, 2010

Basmati Rice


Basmati rice is generally served with Indian food. It's has a longer grain than most other rice; it also has an incredible, nutty aroma while it's cooking. You can, of course, simply cook the rice according to package directions and it's lovely. We like to dress ours up just a little bit when we serve it with a nice curry or other Indian dish.

The peas, by the way, are optional.

Basmati Rice

1 ½ cups basmati rice
3 Tbs. vegetable oil
1 small onion, cut into thin slices
1/2  teaspoon garam masala
2 cups chicken broth
1 cup frozen peas

Wash the rice in several changes of water and drain. Cover generously in water and soak for 30 minutes. Drain thoroughly. Heat the oil in a small, heavy pot over medium high heat. When hot, add the onion and stir until it is brown. Add the rice and garam masala. Stir for a minute. Now put in the broth and bring to a boil (or transfer rice to rice cooker and add broth and stir). Cover tightly, turn heat to very low, and cook 20 minutes. Add the peas. Cover tightly again and cook another 5 to 7 minutes. Stir gently before serving.

Monday, May 3, 2010

Chicken Coconut Kurma

First, although my mother taught me never to begin with an apology, let me apologize for the less-than-perfect photo. This tastes really good, though. Chicken coconut kurma is one of my favorite dishes at Indian restaurants. The same sauce can be used with other meats; we like chicken so much that we've never ventured out. The coconut cream and raisins give this a sweetness that contrasts nicely with the rest of the savory flavors.

Chicken Coconut Kurma

½ teaspoon salt
1 teaspoon cumin
½ teaspoon ground coriander
¼ teaspoon turmeric
¼ teaspoon cayenne
¼ teaspoon black pepper
2 ½ to 3 pounds skinned, boneless chicken thighs or breasts, cut into bite-sized pieces

Mix the spices together and stir over the chicken pieces. Mix well and refrigerate for at least one hour.

6-7 cloves of garlic, peeled
1 inch square of ginger root, fresh
1 ½ cups of water

Put the ginger and garlic in a blender with ½ cup of the water. Blend until smooth.

4 Tbs. of vegetable oil
1 medium onion, chopped
1 teaspoon salt
1 teaspoon cumin
1 teaspoon ground coriander
1/4 teaspoon turmeric
2 medium tomatoes, peeled and finely chopped
6 tablespoons plain low-fat yogurt, whip until very smooth
2 tablespoons golden raisins
¼ cup cashews
1 teaspoon garam masala
½ cup coconut cream (sold by the can in most Asian stores; it's thicker than coconut milk)

Heat the oil in a heavy, non-stick pan. When hot, put in as many chicken pieces as will fit on the bottom. Cook until browned and repeat with other pieces of chicken. Set the chicken aside.

Put the onion in the remaining oil and fry hot until they turn medium brown. Add the garlic-ginger paste. Stir and fry until the water evaporates. Put in the remaining cumin, coriander, turmeric, and cayenne. Fry for about 30 seconds. Now put in the chopped tomatoes. Turn heat to low and cook for three to four minutes, mashing the paste with the back of a spoon. Add the yogurt, one tablespoon at a time. Add raisins and cashews. Put in the chicken and any accumulated juices, ¾ cup of water, and one teaspoon of salt in the pan. Bring to a boil. Cover and simmer for 20 minutes. Take off the cover and add the garam masala and coconut cream. Mix gently. Turn up the heat and cook, stirring gently now and then until the sauce becomes fairly thick.

Friday, April 30, 2010

Naan


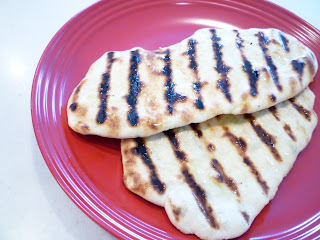
We've experimented with making naan, an Indian flat bread, at home. We don't have a tandoor, so it's not perfect yet. But this version makes a reasonable facsimile. It's quite simple. I've found the key is to roll the sections out as thin as humanly possible while still being able to handle the dough. Then Bob cooks it on the barbecue, basting it with olive oil infused with a little bit of garlic as he goes.

Naan

1 ¼ teaspoon yeast
½ cup warm water
4 1/2 teaspoons white sugar
2 tablespoons milk
1 egg, beaten
¼ teaspoon soda
1 teaspoon salt
2 ¼ cups bread flour
1 tsp. finely minced onion (optional)
2 tablespoons olive oil mixed with 1 teaspoon minced garlic
In a large bowl, dissolve yeast in warm water. Let stand about 10 minutes, until frothy. Stir in sugar, milk, egg, salt and enough flour to make a soft dough. Knead for 6 to 8 minutes on a lightly floured surface, or until smooth. Place dough in a well oiled bowl, cover with a damp cloth, and set aside to rise. Let it rise 1 hour, until the dough has doubled in volume.

Punch the dough down and knead in the minced onion if you want onion-flavored naan. Pinch off small handfuls of dough about the size of a golf ball. Roll into balls, and place on a tray. Cover with a towel, and allow to rise until doubled in size, about 30 minutes.

During the second rising, preheat grill to high heat.

Roll each ball of dough out into an oblong shape. Lightly oil grill. Place dough on grill and cook for 2 to 3 minutes, or until puffy and lightly browned. Brush uncooked side with oil, and turn over. Brush cooked side with oil, and cook until browned, another 2 to 4 minutes. Remove from grill, and continue the process until all the naan has been prepared. (Serves about 9)