Search This Blog

Thursday, December 31, 2009

Anniversary Chicken


Almost exactly a year ago I had one of those desperate evenings when I had no idea what to make for dinner. I browsed a couple of recipe sites for ideas and found this dish that happened to include ingredients that we happened to have on hand. When Bob looked at the recipe, he said, "Sounds like a teenage boy's dream come true--teriyaki sauce, ranch dressing, bacon, cheese--what more could they want?" And in fact, our son asked for it a couple of weeks later for his eighteenth birthday dinner.

I passed the recipe on to my sister-in-law, Marianne. I don't think I made it again. Last week Mari asked why the recipe wasn't on the blog. "Because I never make it," I said. She said that she makes it all the time and felt that it should be shared with the rest of the world, so I made it for dinner the other night and was pleasantly surprised. It was much better than I remembered.

I made a few changes this time. Instead of using straight teriyaki sauce, I thickened our usual sauce with a heaping teaspoon of cornstarch, cooked on the stove top until it thickened a bit. You can also use prepared sauce from the store; I can't recommend a particular brand, but I'd recommend something that looks thick enough to stay on the chicken. I also used our homemade ranch dressing, but commercial brands work just fine. As one last note, I used chopped, sauteed white onions for this version because that is what I had in the pantry (I sauteed them in the leftover bacon drippings). Finely chopped green onions (not sauteed) also work well and are a bit prettier, in my opinion.

Anniversary Chicken
1/3 pound bacon, cooked and crumbled
6 boneless, skinless chicken breasts, pounded flat
1 Tablespoon olive oil
3/4 cup teriyaki sauce (thicken with corn starch if necessary)
1/2 cup ranch dressing
1 cup grated cheddar cheese
3-4 green onions, finely chopped

Preheat oven to 350 degrees. Heat the olive oil in a large skillet on the stove top. Fry chicken in hot oil until light brown on both sides, 3-4 minutes per side. Arrange chicken in a baking dish. Spoon the teriyaki sauce over the chicken breasts. Add a spoonful of ranch dressing to each breast and spread evenly. Top with cheese, then top with onions and bacon. Bake for about 20 minutes, then serve.

Tuesday, December 29, 2009

Yet Another Spinach Salad


While I have posted a couple of other spinach salad recipes (see here and here), this is the original and best loved spinach salad in our family. It's taken awhile to get it just right. I started out with a mustard viniagrette dressing about which Bob was not too enthusiastic. I then made a sweeter dressing that I didn't think had enough personality. But a couple of days ago I found what might be the perfect combination for our family. It's an easy dressing with just the right combination of tanginess and sweetness.

As with many salad recipes, there are endless variations. I've listed some of our favorite ingredients below. We mix and match according to what we have on hand and what seems to look the prettiest. The kids agree that the essential ingredients are bacon (of course), eggs and cheese. And of course, spinach.

Spinach Salad
6-8 cups fresh spinach, stems removed
1-2 mushrooms, thinly sliced
5-6 bacon slices, cooked and crumbled
3-4 radishes, thinly sliced
1/3 to 1/4 red onion, thinly sliced
1-2 carrots, shredded or thinly sliced
1/2 cup mozzarella or cheddar cheese, grated
2-3 hard boiled eggs, sliced

Mix all ingredients except the eggs in a large mixing bowl. You can actually chop up the eggs and mix them in if you like; I think they look great sliced and placed on top. Toss all the ingredients with the dressing (recipe below). Top with the eggs if you chose not to mix them in.

Spinach Salad Dressing
1/2 cup creamy salad dressing (e.g. Miracle
          Whip®)
1/3 cup white vinegar
1/3 cup white sugar
1 teaspoon poppy seeds

Transfer to a serving dish and serve.

Wednesday, December 23, 2009

Pomegranate - Avocado Salsa


I admit to being a little bit sheepish about posting this appetizer. I got it from a friend a few years ago, and it took me awhile to persuade her to share it. She had obtained the recipe from a friend who felt it was hers. But it's got the most incredible flavors, and when you don't use mushy tomatoes (see above), it's downright beautiful. The perfect accompaniament for it seems to be Fritos (the big brown things sticking out of the middle of it, which was intended to be decorative). I like the larger Scoops version of Fritos because you can fit more salsa in the middle for a more diverse bite.

The colors make this a perfect Christmas appetizer (that and the fact that winter is pomegranate season). Perhaps the most difficult part of this recipe is seeding the pomegranate. The first time I tried it, I think the kitchen was almost completely pink with pomegranate juice. For a video that shows you an easy way to do it, see here.

Pomegranate-Avocado Salsa
1 ripe avocado, diced small
1 large tomato, diced small
1 T. finely chopped onion
1/4 t. ground coriander
1/2 t. salt
1 T. lemon juice
1/8 t. cayenne pepper (more if you like it spicy)
Seeds of one pomegranate

Mix all ingredients together. Serve with large Fritos corn chips or Fritos Scoops.

Tuesday, December 22, 2009

Shrimp Dip


Here it is, another remarkably simple appetizer that won't embarrass you, even in the nicest settings (unless someone's allergic to shell fish). This is a favorite of my dad's. We served it last night at a family party.

Shrimp Dip
1 8-ounce package of cream cheese, softened
1 bottle of cocktail sauce
1 6-ounce can of tiny shirmp

Spread the cream cheese evenly on a plate. I like to leave rather deep fork marks on the cheese so that it makes ridges for the cocktail sauce to settle into. Pour cocktail sauce over the cheese. I often only use about 3/4 of the bottle because I don't want it to be overpowering. Then sprinkle the tiny shrimp over the top. We usually serve this dip with an average sort of cracker such as Town House or Ritz; you don't want to use anything too flavorful or it will clash with the flavor of the dip.

Monday, December 21, 2009

Clam Dip


In honor of appetizer week, here's a recipe that we recently tried straight off of the clam can. It's a simple yet lovely dip that is a little more elegant than average.

The dip is shown here with a potato chip, the scoop of choice mentioned on the can. However, we found that the saltiness and greasiness of the chip overpowered the more subtle flavors of the dip. We tried some spread on baguette slices and liked it much better.

The recipe came from a can of Snow's clams. I've read other places that Snow's is an excellent brand in comparison to others; since I'm using their recipe, the least I can do is give them credit!

Clam Dip
1 8-ounce package of cream cheese, softened
1/2 cup sour cream
1 6-ounce can minced clams, drained, reserving
2 tablespoons clam juice
1 tablespoon chopped fresh parsley
1 clove garlic, finely chopped
1/2 teaspoon Worchestershire sauce

In a small mixing bowl, beat cheese, sour cream and reserved clam juice until smooth and well blended. Stir in remaining ingredients. Cover, chill thoroughly. Serve with sliced baguettes. Refrigerate leftover dip.

Saturday, December 19, 2009

Ham Rolls


This is another favorite that we generally only make around Christmas. This was a recipe I learned from my sister Pat that my children have enthusiastically embraced. We always make a lot of these, and they never last very long. They're a simple yet beautiful little delicacy.

Ham Rolls

1 package deli or sandwich sliced ham
1 8-oz. package cream cheese, softened to room temperature
Green onion stems or chives

Spread a thin coat of cream cheese on each ham slice. Lay the green part of an onion stem (or chive) on the slice. Role the ham slice like a jelly roll or sweet rolls. Chill ham rolls for 1-2 hours, then slice into 3/4 –inch segments.

Thursday, December 17, 2009

Pigs in a Blanket


One of our favorite holiday traditions is hosting an appetizer dinner party on Christmas Eve. We invite everyone from any side of our family. Half of the fun is thinking in the weeks preceding Christmas about all the many appetizers we can make.

This particular appetizer is a favorite with kids. It's also easy enough that our kids can make it. It's probably a stretch to even call it a recipe, but I'll include a recipe for honey mustard dipping sauce just to keep everything on the up and up. Other favorite dipping sauces include barbecue sauce or mandarin sauce. The kids insist that ketchup is also really good with them, but I haven't been able to bring myself to try it.

Pigs in a Blanket
1 package cocktail sausages, such as Little Smokies
2-3 packages pop out crescent rolls

Pre-heat oven to 350 degrees. Open the packages of crescent rolls. Cut each perforated roll into three roughly triangular sections. Wrap a cocktail sausage in each section of roll. Seal it carefully and place on an ungreased cookie sheet. Bake for 10-11 minutes or until golden brown on top. Remove from the oven and serve them while they're hot!

Honey Mustard Dipping Sauce
1/4 cup Dijon mustard
2 tablespoons honey
Mix honey and mustard and serve alongside Pigs in a Blanket

Tuesday, December 15, 2009

Ranch Dressing


About a year ago I was playing Scattegories with the kids. The letter we rolled was "R" and one of the categories was "beverage." Anna, who is eight, wrote "Ranch" as her answer. And given the way ranch dressing is treated in our home, we let her count it as being correct.

While the kids are ranch fiends and will consume incredible quantities of it in almost any form, Bob and I are what you might call ranch snobs. This is our new favorite home made version. We make vats of it (I am not making this up), but have scaled back the quantity to a level more appropriate to the average ranch consumer.

Ranch Dressing
1 teaspoon salt
1 teaspoon sugar
1 1/4 teaspoon parsley flakes
1 teaspoon granulated garlic
3/4 teaspoon granulated onion
Dash white pepper

Combine the above ingredients and mix well. Then add:

6.5 ounces buttermilk (yes, it helps to have a kitchen scale. If you don't have one, use a little over 3/4 cup)

Add these ingredients and mix well:

13 ounces mayonnaise (a little less than 1 1/2 cups)
8 ounces sour cream (one cup)

Refrigerate for a couple of hours before serving.

Friday, December 11, 2009

Easy Cheesy Rolls


These rolls were inspired by the breadsticks served at Magleby's, a local restaurant. We tried a similar version at a party and decided to give them a whirl. They are delicious and easy, although not particularly healthy. Our kids love them; I may have worked myself out of the real roll-making business for awhile.

The "recipe" gives you general directions; one of the beauties of this recipe is that as long as you have a bag of Rhodes or other frozen rolls, some butter, grated parmesan and Johnny's garlic seasoning and spread (available at Costco), you can make as many or as few as you like.

Easy Cheesy Rolls
Rhodes or other frozen roll dough
Melted butter - I used about 3/4 of a cube to make 24 rolls
Grated parmesan cheese - I used about two cups to make 24 rolls
Johnny's garlic seasoning and spread (I used about 1/2 cup for 24 rolls)

Thaw the rolls until they are soft but before they have begun to rise, about two hours. Immerse each roll in melted butter, then roll in parmesan cheese. Finally, roll the dough lightly in the garlic seasoning. Allow rolls to continue rising in a warm place for another hour. Bake at 350 degrees for 15 minutes or until the rolls are light golden brown.

Wednesday, December 9, 2009

Mandarin Sauce


I got this recipe a few years ago when I was on the committee to plan a church dinner. We served ham, and one of the other committee members contributed the recipe for this sauce. I stored the recipe away for a few years until one Sunday when we discovered that the particular brand of spiral sliced ham that I had prepared didn't come with a seasoning packet. I quickly found the recipe and whipped it up; we haven't used seasoning packets since.

This sauce has a number of alternate uses. It's great on chicken nuggets for a quick kids meal. Since the recipe makes quite a bit more than we ever eat as a ham sauce in a single meal, we also often make a quick meal a few days later by adding some stir fried chicken, pineapple chunks, green pepper and onions for sweet and sour chicken. It's great served over white or fried rice.

Mandarin Sauce
1 cup canned diced tomatoes
½ cup cider vinegar
½ cup chopped onion
½ cup chopped green pepper
½ cup crushed pineapple (juice and all)
1 ½ cup granulated sugar
½ teaspoon ginger
Dash red cayenne pepper
1 teaspoon soy sauce
1 Tablespoon corn starch
1/4 cup water

Combine all ingredients except water and cornstarch in a blender and puree until liquified. Transfer to a small saucepan, bring to a boil, then let simmer for 20 minutes.  Mix cornstarch with 1/4 cup water and add to the sauce; bring to a boil and cook until it thickens, about five minutes.

Monday, December 7, 2009

Buttermilk Pie


This is a dessert that we learned how to make out of sheer frugality. A local restaurant used to have a lovely dessert parlor that served cake, pie, ice cream, etc. It was a great but somewhat expensive place to stop after an evening out. We loved their buttermilk pie the first time we tried it; we liked it enough that we went back several times. After a few visits, Bob calculated how many complete pies we could make for the price of one store-bought slice. We searched the internet and found many, many recipes. We combined, experimented, modified and came up with this as our final version.

I love buttermilk as a beverage, but if you aren't a fan, don't shy away from this pie. It has a mild, custardy taste. It's another recipe that's extremely easy to make, but dresses up well for a party or guests. We prefer it warm, but it can easily be heated in the microwave for a few seconds if your schedule doesn't work out to take it out of the oven just before serving. Then top it with whipped cream and the berries of your choice. Thaw the berries ahead of time so that there's a little juice to drip over the cream.

Buttermilk Pie

1 recipe pastry for a 9-inch single crust pie (for my viewpoint on the make vs. buy decision on pie crusts, see here.)
1 ¼ cups white sugar
¼ cup all purpose flour
2 c. buttermilk
3 eggs
1 t. vanilla extract
¼ c. butter

Mix sugar and flour. Add buttermilk, beaten eggs, vanilla. Melt the butter over low heat. Add to buttermilk mixture and mix well. Pour into pie crust and bake at 360 degrees for 80-90 minutes or until brown on top. I know that 80 to 90 minutes sounds like a very long time to cook. Even then, it will probably still jiggle when you take it out. But it will settle into a solid pie. Leave it in until the top starts to brown a little. Then take it out and let it rest awhile before serving.

Also, I've never tried this with soured milk (milk with vinegar or lemon juice added). I've substituted that combination for other recipes that call for buttermilk, but I've always used the real thing for this recipe.

Wednesday, December 2, 2009

Meatloaf Sandwiches


No one believes me when I tell them they're going to like meatloaf sandwiches. But almost always after just one try, they are convinced.

Meatloaf sandwiches are a great use of meatloaf leftovers. Believe it or not, they are better when the meatloaf is cold. I like mine very plain--Miracle Whip or mayonnaise, meatloaf, and classic white bread. Bob, of course has improved upon my original "recipe." Here's his list of preferred ingredients.

Meatloaf Sandwich
2 slices white bread
Miracle Whip or Mayonnaise spread of both slices of bread (he did a taste test between the two today, which I believe was inconclusive)
Enough 1/4-inch sliced meatloaf to cover the bread
1 or 2 slices of dill pickle
1 or 2 slices of cheddar cheese
1 leaf of romaine lettuce (although I'm sure iceberg would also suffice)
Thinly sliced rings of red onion

Here's a photo to illustrate his construction process:


Monday, November 30, 2009

Best Ever Meat Loaf


Let's face it: most people don't find meat loaf all that exciting. This recipe has changed all of that for my family. With a couple of exceptions, we all look forward to this dinner. It's a good winter meal because it's hearty. We have actually served this to guests with very favorable results.

There are a variety of ways to serve it. Bob likes to dress up the meatloaf by putting it on a thick-sliced piece of French bread, grilled with butter and parmesan cheese on it. He then drizzles a little barbecue sauce over the top. At other times, we serve it with a side of mashed potatoes and gravy for true comfort food. It's also a substantial meal on its own with a salad or side of mixed vegetables.

This recipe makes quite a lot. We make it in our industrial-size loaf pan that is roughly equivalent to two standard loaf pans. Our family eats about three quarters of this in one meal. If you're cooking for fewer people, you  may want to reduce the recipe. But be sure to make enough so that you have leftovers for meatloaf sandwiches!

Best Ever Meatloaf

3 Tbs. butter
¾ cup onion, finely chopped
¾ cup green onion, finely chopped
½ cup carrots, finely chopped
¼ cup celery, finely chopped
¼ cup red bell pepper, minced
¼ cup green bell pepper, minced
2 teaspoons minced garlic
1 teaspoon freshly ground black pepper
½ teaspoon ground white pepper
¼ teaspoon cayenne pepper
1 teaspoon ground cumin
½ teaspoon ground nutmeg
3 eggs, well beaten
½ cup ketchup
½ cup half-and-half
2 pounds lean ground beef chuck
12 ounces sausage meat (we like Jimmy Dean breakfast sausage)
¾ cup fine fresh bread crumbs
Preheat oven to 375 degrees. Melt the butter in a heavy skillet, and add the onion, scallions, carrots, celery, bell peppers and garlic. Cook until the moisture from the vegetables has evaporated, about 10 minutes.
Combine the black pepper, white pepper, cayenne, cumin, nutmeg and eggs in a mixing bowl, and beat well. Add the ketchup and half and half. Blend thoroughly. Add the ground beef, sausage and bread crumbs to the egg mixture. Then add the chilled vegetables and mix thoroughly with your hands.

Place the mixture evenly in a large loaf pan. Place the pan in the oven and bake for 60 minutes or until brown all the way through. Remove from oven; let rest for 20 minutes before slicing and serving.

Friday, November 27, 2009

Original Pantry Coleslaw


For several years now, Bob has been telling me about the coleslaw from the Original Pantry, a restaurant in downtown Los Angeles that he frequented when he lived in southern California. He recounts that they serve coleslaw like Mexican restaurants serve chips and salsa--everyone gets it as an appetizer when they sit down.

For several years I have used an alternative coleslaw recipe that was more tangy than this one. The other night I discovered a head of cabbage in the fridge and wondered what I could do with it. I decided to try the Original Pantry recipe. When I asked the kids if they noticed any difference between this coleslaw and our usual coleslaw, one of them responded, "Yes. This one tastes good." So there you have the family editorial on my (apparently former) coleslaw recipe.

This recipe really does taste good, and has a creamy, luxurious feeling to it given that one of the ingredients is, well, cream. It's great as a salad for a picnic, or the perfect complement to barbecue (see my pulled pork recipe, for example). The original recipe calls for cabbage as the only vegetable. I added a bit of carrot because I happened to have a peeled carrot right in front of me, and I also like the color it adds.

Original Pantry Coleslaw
3/4 cup mayonnaise
3 tablespoons sugar
1 1/2 tablespoons white wine vinegar
1/3 cup oil
1/8 teaspoon garlic powder
1/8 teaspoon onion powder
1/8 teaspoon dry mustard
1/8 teaspoon celery salt
1 tablespoon lemon juice
1/2 cup half-and-half
1/4 teaspoon salt
1 head cabbage, finely shredded (I have tried using both a food processor and a salad shooter to achieve the appropriate texture, but they both turn the cabbage into a sort of mush. I've discovered that with a high quality kitchen knife, it's actually faster to just chop it).
1 grated carrot, optional

Blend together mayonnaise, sugar, vinegar, and oil. Add garlic and onion powders, mustard, celery salt, pepper, lemon juice, half-and-half, and salt. Stir until smooth.

Pour dressing over cabbage in large bowl and toss until cabbage is well coated.

Wednesday, November 25, 2009

Egg Salad Sandwiches


This post is more of a meal idea than it is an actual recipe. This is a Sunday afternoon favorite at our house. It's an easy way to make everyone happy. Eggs have been comparatively cheap in all of the Thanksgiving sales, so we made up a batch this week.

Although some people like to keep their egg salad as little more than eggs and salad dressing or mayonnaise, we really like to put the salad in our egg salad sandwiches. Although we generally fall in the mayonnaise camp on the big mayonnaise vs. Miracle Whip debate (see here), this is one recipe that is really better with whipped salad dressing--the tanginess and sweetness are a great complement to the more neutral flavor of the eggs. So pick and choose from the ingredient possibilities below; we usually use the ones we happen to have on hand.

Also, we usually try to find fancy breads to complement our specialty sandwiches. But in this case I have to say that there's nothing like plain, white wonder-type bread from the grocery store.

Egg Salad Sandwiches

5-6 hard boiled eggs, peeled and diced

Choose from the following ingredients. Use 1-2 tablespoons of each and dice them small.

Celery
Yellow, red or green onions
pickles or relish (we especially like bread and butter pickles)
olives

Dressing:
1/4 cup Miracle Whip (use mayonnaise if you must, but you'll be missing out)
1-2 teaspoons yellow mustard
1 teaspoon pickle juice or cider vinegar
1/8 teaspoon celery seed
salt and pepper to taste

Thoroughly mix dressing ingredients. Add to salad ingredients and stir until coated. Spread on white, sliced bread. Serves about 8.


Monday, November 23, 2009

Cilantro Lime Rice


A year or so ago the host of our dinner group planned to serve fish tacos. She asked us to try to find an alternative to traditional Mexican rice to bring as a side dish, preferably a sweet or lime rice. We tried four or five different sweet rice recipes, all of which were miserable failures.

A few months ago my friend Amanda sent this recipe, which I've modified slightly and continue to make with never a bad batch. Tonight when I made it to go with Tacos de Machaca, the kids thought it was unusually good. This is a knock off of the rice recipes served at local fresh Mex restaurants like Cafe Rio.

Cilantro-Lime Rice

1 cup uncooked long-grain rice
1 teaspoon vegetable oil
1 small onion, diced
2 cloves garlic, minced
1 teaspoon lime zest
2 ½ cups chicken broth
2 tablespoons freshly squeezed lime juice
3 tablespoons fresh chopped cilantro

Melt butter or margarine in a large saucepan. Saute onion until translucent; add garlic for the last couple of minutes. Add rice and lime zest. Saute rice until it turns opaque. Add the chicken broth mixed with lime juice and bring to a boil. Cover and cook 25-30 minutes on the lowest heat setting until rice is tender and liquid is absorbed.

Remove from heat and stir in the cilantro. Place a double layer of paper towel under the lid. Let it sit for five to ten minutes.

Friday, November 20, 2009

Carrot Cake


For someone who claims not to be crazy about desserts, I realize that I have been on a bit of a dessert binge recently (at least as far as blog posts are concerned). Perhaps I will break down the "Cookies and desserts" category on my blog into smaller headings so that we can all feel better about my eating habits.

Last week, Anna, Jenny and I went to harvest the last of our garden (see more about it here). We dug up tons of carrots and talked the whole time about all the things we could make with them. We all agreed that carrot cake was our first choice (Anna isn't a fan of cooked carrots). I have been using the Betty Crocker recipe, but haven't been all that happy with the results. I went looking around and found this, which I have modified a bit from the original recipe. It's good.

Carrot Cake
4 eggs
1 1/4 cups vegetable oil
1 cup white sugar
1 cup brown sugar
2 teaspoons vanilla
2 cups all-purpose flour
2 teaspoons baking soda
2 teaspoons baking powder
1/2 teaspoon salt
2 teaspoons cinnamon
1/2 teaspoon nutmeg
3 cups grated carrots
1 cup chopped pecans

Preheat oven to 350 degrees. Spray a 9 x 13 cake pan with cooking spray.

In a large bowl, beat together eggs, oil, white sugar, and vanilla. Mix in flour, baking soda, baking powder, salt and cinnamon. Stir in carrots. Fold in pecans. Pour into the prepared pan.

Bake in the preheated oven for 40 to 50 minutes or until a toothpick inserted into the center of the cake comes out clean. When it's cooled, top with cream cheese frosting. We tried the recipe below, which wasn't as stiff as our usual recipe. I liked it, though, because it tasted great and was less sweet than my usual version.

Cream Cheese Frosting
1/2 cup butter, softened
8 ounces cream cheese, softened
3 1/2 cups powdered sugar
1 teaspoon vanilla

In a medium bowl, combine butter, cream cheese, powdered sugar and vanilla. Beat until the mixture is smooth and creamy. Frost the cooled cake. Note: This recipe makes enough to frost the cake after it has been removed from the pan. If you put all of this on a cake that is still in the pan, prepare to be sick.

Wednesday, November 18, 2009

Seven (or Eight or Nine) Layer Salad


This is a classic salad made better by a novel dressing. The classic name is Seven Layer salad, implying, of course, that there are seven layers. The version featured in the photo was made by my twelve-year-old daughter Sara. It's a pretty salad, and has endless variations. For example, we can never settle on just seven layers.

We've started using a ranch-flavored dressing instead of the traditional layer of mayonnaise (yuck). We like this salad a lot.

Seven (or Eight or Nine) Layer Salad

Layer as many of the following foods as you like, as you have on hand, or as you think will fit in the bowl. We generally use a clear glass bowl for the complete visual effect.

1 head romaine lettuce
2-3 shredded carrots
1 bunch green onion, chopped (red onion works great, too)
1/2 cup chopped celery
1/2 cup chopped green pepper
2 diced Roma tomatoes
1 thinly sliced cucumber
2-3 hard boiled eggs, sliced
1/4 pound bacon, cooked and crumbled
1/2 cup grated cheddar cheese (I like to use the large side of the grater)

We've found lettuce works well as a base, and that peas or eggs work well as the last layer before the dressing. I like to alternate colors, usually alternating green and non-green layers. After the top vegetable layer is in place, spread the dressing (see recipe below) over the top. Then garnish with bacon and cheese.

Dressing
1 cup mayonnaise
1 cup sour cream
1 package dry ranch dressing mix (7/8 ounce)
Mix the ingredients thoroughly. Spread over top vegetable layer of the salad.

There are two ways to serve this: you can toss it once it's on the table and everyone has had a chance to see how pretty it is. Or you can serve it by taking a cross section of the salad (rather than taking from the top).

Monday, November 16, 2009

Cheese Ball


When I unveiled this cheese ball at a dinner party a few nights ago, someone commented that it must be holiday time. I guess nothing says "Christmas" like a cheese ball, even though I've been known to make this in the summer because we like it so much. It's simple and delicious, and looks a lot fancier than it really is. This is one recipe that I think I can take full credit for, even though I've experimented by looking at other cheeseball recipes through the years. This has become our standard.

As with many recipes, the possibilities for variations abound. I've found that sharp cheese really does make a difference. But green peppers work just as well as red peppers (although they aren't as festively pretty at Christmas time), and red or yellow onions can easily be substituted for the green onions if you prefer or don't have green onions on hand. And walnuts and pecans work equally well for the nuts on the outside.

Kathy's Cheese Ball
8 ounces cream cheese, softened to room temperature
1 cup shredded sharp cheddar cheese
1/3 cup finely chopped green onions
1/3 cup finely chopped red bell pepper
1/2 teaspoon granulated garlic
2 teaspoons Worchestershire sauce
1/2 cup chopped walnuts or pecans

Combine cheeses, onions, pepper, granulated garlic and Worchestershire sauce in a large bowl. I find it easiest to do this by hand, wearing a latex glove. When all ingredients are thoroughly mixed, shape the mixture into a ball. Place the chopped nuts on a plate and roll the ball in the nuts until all outside surfaces are covered. Refrigerate until about 30 minutes before serving time; then take it out of the fridge so that it will be soft enough to spread. We've found Wheat Thins to be the cracker to serve with a cheese ball because they're sturdy enough to not crack under the pressure of the cheese and also have a great complementary flavor.

Friday, November 13, 2009

Picnic Cake


I don't remember my Grandma making this cake very often, but I remember making it with her at least once. She didn't learn to drive until she was well into her sixties, after my grandfather passed away. So I'm quite certain that the two of us (and maybe a couple of my sisters or some cousins) walked to the grocery store to get the ingredients that she was missing. I expected not to like this cake because dates sounded unappealing to me, but I never even knew they were there. When I re-discovered this recipe a few years ago, it was like spending that day with Grandma all over again.

This is now a family favorite. It's a particularly unhealthy dessert (I've actually cut down the fat a bit from the original recipe), so we try to eat it as an occasional treat. For some real indulgence, try warming it up and topping it with a spoonful of whipped cream.

Picnic Cake
1 cup pitted, chopped dates
1 cup boiling water
1 tsp. soda

Boil water, then pour over dates. Stir in baking soda and let mixture cool.

8 tablespoons butter, softened to room temperature
1/2 cup brown sugar
1/2 cup white sugar
1 egg
1 1/2 cups flour
1/2 cup chopped nuts (either walnuts or pecans)
1 teaspoon vanilla
1/2 teaspoon salt

Mix above ingredients well. Add the date mixture to this batter and fold all together. Pour into a greased 9" x 13" pan. Sprinkle with the following:

1 cup semi-sweet chocolate chips
1/2 cup brown sugar
1/2 cup chopped nuts
8 tablespoons butter, melted

Bake at 350 degrees for 35 - 45 minutes.

Wednesday, November 11, 2009

Celery Salad


The recipe for this salad was published in Cooking Light magazine a few years ago. I discovered it when my friend Karen made it for dinner when I visited her in Minneapolis. I've found that it doesn't appeal to every palate, especailly some of the palates that live at my house. But I love the crunchiness and combination of flavors. I made it for my lunch group last week, partly because I had remarkable amounts of celery.

The recipe calls for dried cherries. I substituted dried cranberries this time and liked them almost as well as the cherries I've used before. I've never thought of this as a holiday salad before because I've always made it in the summer, but the red and green colors (plus the Christmas music playing in the background) made it seem like a perfect fit for Thanksgiving or Christmas dinner.

Celery Salad
1 1/2 cups sliced celery
1 1/3 cups dried sweet cherries
1 1/3 cups frozen green peas, thawed
1/4 cup chopped pecans
1/4 cup plus two tablespoons fat-free mayonnaise
1/4 cup plus two talespoons plain low-fat yogurt
4 1/2 teaspoons fresh lemon juice
1/2 teaspoon salt
1/2 teaspoon black pepper

Combine celery, cherries, peas and pecans in a large bowl. Mix remaining ingredients in a jar with a lid and shake until well mixed. Pour the dressing over the other ingredients and mix until everything is well coated.

Monday, November 9, 2009

Jalapeno Jelly


It's taken me a few months to decide when to post this recipe (and I ultimately decided more by default than by logic). I make this jelly in September or so when jalapenos and red bell peppers are abundantly available. It's good any time, and I actually discovered it at a party at my sister's house during harvest season. But the lovely colors make it a perfect holiday treat, and even a nice holiday gift. Since the jars are sealed, it will keep for at least a year after you make it. It's a wonderful combination of hot and sweet. Our favorite way to eat it is with a little bit of cream cheese on a Wheat Thin (for some reason they are the perfect complement for this particular spread).

The jars almost always seal on their own if you pour the jelly in when it's very hot. If they happen not to seal, you can process them in a steam bath for about 10 minutes and they should seal with no problem.

Jalapeno Jelly
1 cup red bell pepper, cut in strips
1 1/2 cups cider vinegar
1/3 cup fresh quartered jalapeno peppers, seeds removed (or you can leave the seeds in if you like it a little hotter)
5 cups sugar
1 pouch (3 ounce) Certo liquid fruit pectin (the powdered kind doesn't work with this recipe)

Combine peppers and vinegar in a food processor. Process to desired size; I like the pieces a little smaller than 1/4 inch. Combine peppers and vinegar with sugar in a large saucepan and bring to a boil. Boil for five minutes. Remove from heat. Cool for two minutes, then mix in pectin. Pour into sterilized half-pint jars and fasten lids. If the pepper pieces aren't evenly distributed, invert jars a few times after 30 minutes to distribute evenly before jelly sets.

This recipe makes about six cups.

Saturday, November 7, 2009

Teriyaki


This is Bob's signature dish. He learned to love plate lunch when he was growing up in southern California and hung out with a Hawaiian friend; later he found a wonderful teriyaki sauce recipe. We make this often for guests. The teriyaki recipe makes a remarkable quantity of sauce, but it stores easiliy (doesn't require refrigeration) and then you can use it as a marinade any time you want. Or the recipe can also be reduced.

We use thinly sliced pork or beef - steak from the Mexican store is perfect--or chicken thighs (breasts tend to be too dry). Pork steaks work well and are very inexpensive. When we're cooking for a crowd, we usually prepare a couple of different kinds of meat for the sake of variety.

Teryaki Sauce

½ gallon soy sauce
2 cups water
10 cups sugar (now you know why it tastes so good)
2 Tbs. granulated garlic
1 Tbs. ground ginger

Combine ingredients in a large pot and stir together over low heat until sugar is dissolved. Use several cups to marinate meat (pork steaks, chicken thighs, beef, etc.) for 2 to 3 hours before grilling. After grilling the meat, chop it into bite-sized pieces. Serve with short grain or Japanese rice; pour additional sauce on rice topped with chopped meat. Makes one gallon.

Thursday, November 5, 2009

Potstickers


I suppose potsticker is the Enligsh name for these little delicacies; they are known in Japan as gyoza, in China as jyaudz, and in Korea as mandoo. Whatever you choose to call them, they are fabulous, and easier to make than you might think.

For several years we were consumers of the Costco frozen variety. Then a few years ago our Japanese neighbor, Yumi, came over to teach us how to cook a variety of Japanese foods. We've been making these ever since.

Potstickers
1 lb. ground pork
2 T. soy sauce
1 ½ cups shredded Napa cabbage
½ t. hot chili oil, or to taste
2 green onions, diced ½ t. sesame oil
4 t. fresh ginger (2 t. dry)
4 T. vegetable oil for frying
1 egg lightly beaten
1 pkg. round potsticker wrappers

In a medium bowl, combine the ground pork, shredded cabbage, green onion, ginger, egg, soy sauce, chili oil and sesame oil.

Lay a wrapper in front of you. Place a teaspoon of filling in the middle of the wrapper. Wet all the edges with water. Fold the sides up to form a semicircle, and then pinch the edges firmly to seal. We like to pleat the top edge after we've sealed it to make it prettier. Continue with the rest of the wrappers until the filling is gone.


To cook, heat 1 tablespoon oil in a heavy frying pan over medium-high to high heat. Add 12 - 15 of the potstickers and cook for 2 minutes, or until golden brown on the bottom. Turn the potstickers. Add 1/2 cup of water to the pan. Cover the pan and cook until the water is absorbed (5 to 7 minutes). Repeat with the remainder of the potstickers.

Potsticker Sauce

1/4 c. white vinegar
1/4 c. soy sauce
1 tsp. sesame oil
3 Tbs. sugar
1 tsp. ginger
Mix all ingredients together. Serve over potstickers.

Monday, November 2, 2009

Microwave Carmel Popcorn


Normally I shy away from recipes with the word "microwave" in their names because they sound sort of, well, cheap. But this is a wonderful snack that became a minor addiction when I was first out of school and living on my own. I can still eat myself sick on it if I'm not careful. It is easy, and is made with ingredients that are usually around the house. At our house, even those who don't care for carmel popcorn like this.

Microwave Carmel Popcorn
4 quarts popped popcorn
1 cube butter
1/2 cup brown sugar
1 cup miniature marshmallows

Cook the butter for one minute in the microwave. Stir in the brown sugar and cook for another minute. Stir in the marshmallows and cook for another minute. Stir. Cook for another 30 seconds and then stir until smooth. Pour over popped popcorn and stir until popcorn is evenly coated.

Saturday, October 31, 2009

Lemon Pound Cake


Many of my neighbors make a triple chocolate Bundt cake that is truly divine. It starts with a devil's food cake mix, adds instant pudding, and ends with chocolate chips. I've made this cake before with reasonable success, but I think my neighbors are all better at this particular recipe than I am.

A few weeks ago I ran across this recipe. I'm not a big dessert person, but this is a cake that I actually get cravings for. It follows a pattern similar to the triple chocolate cake, but for some reason I seem to be more successful at creating a wonderful cake using this recipe. The glaze makes this cake. Rumor has it that this cake can be frozen for up to a month. It still emerges looking and tasting great.

Lemon Pound Cake
1 box Betty Crocker or Pillsbury lemon cake mix
1 3-ounce box instant lemon pudding
4 large eggs
1 cup sour cream
Juice of one lemon
Zest of one lemon
½ cup oil

Preheat oven to 350 degrees. Thoroughly grease and flour a bundt pan. Mix all ingredients and pour into the pan. Bake for 35 to 40 minutes. Let cool ten minutes, then invert the pan to release the cake.

Lemon Glaze
2 cups powdered sugar
¼ cup lemon juice
Mix sugar and lemon juice with electric mixer. Pour over cake while it is still hot so that a lovely lemon crust will form. Hint: I find it much easier to do this if the cake is on a wire rack with foil or wax paper underneath to catch the drippings.

Friday, October 30, 2009

Shamelessly Stolen Oatmeal Cookies


Normally when I post a recipe, it's something that I've found somewhere else and have modified a bit to make it my own. In a couple of cases I've actually come up with what I think of as totally original recipes. In this case, I've borrowed a recipe wholesale from the blog of my high school friend Kip. My kids have embraced this recipe so enthusiastically that they start singing for joy as soon as they smell them cooking in the oven. Kip has a great story about how he came to have this recipe which you can find here. But if the recipe is what you're really looking for, I've taken the liberty of copying it part and parcel here (although I did change the name of the recipe and added in the cooking time that I like best). They're wonderful cookies.

Shamlessly Stolen Oatmeal Cookies
1 cup brown sugar
1 cup white sugar
1 cup shortening
1 teaspoon vanilla
2 eggs
1 ½ cups flour
½ teaspoon cinnamon
½ teaspoon salt
1 teaspoon baking soda
3 cups oats
3/4 cup chopped walnuts

Cream sugars and shortening. Blend in vanilla and eggs. Then add dry ingredients, oats, and nuts. Roll in balls and place on cookie sheet. Bake at 350 degrees until golden brown, about 14 minutes.

Wednesday, October 28, 2009

Apple Cake with Carmel Topping


This is a recipe that I made when I was growing up and then rediscovered when it was served at a party I went to earlier this fall. Bob usually isn't a fan of fruit-based desserts, but this has become one of his favorites (and a favorite of the whole family). It's also a perfect way to use up the fridge full of apples that we harvested from various friends and family.

A word of warning: the carmel sauce here is overcooked and far too thick. I served this dessert for my book group last night and tried a very small crock pot as a way of keeping the sauce warm until we were ready to eat. When I took off the lid, I was shocked to see that the sauce had continued to boil all the time we were talking. So watch the cooking time, and don't store it in a mini crock pot! I'll try for a better photo next time I make it.

Apple Cake with Carmel Topping
1/2 cup butter or margarine, room temperature
2 cups sugar
2 eggs
2 cups flour
1 cup chopped walnuts
2 teaspoons cinnamon
1 teaspoon nutmeg
2 teaspoons baking soda
1/2teaspoon salt
6-7 apples, peeled and grated

For the caramel sauce:
1/4 cup butter
1/2 cup brown sugar
1/2 cup white sugar
1/2 cup whipping cream
1 teaspoon vanilla
salt

Preheat oven to 350-degrees F.

Spray a 9 x 13 inch cake pan with non-stick cooking spray (Pam) or grease pan and set aside.

In a large bowl cream butter with sugar. Beat in egg. Stir in flour, walnuts, cinnamon, nutmeg, baking soda and salt. Fold in apples. Pour into prepared pan.

Bake for 30-40 minutes or until cake is done and toothpick comes clean when inserted in cake.

Cut in squares when cool and serve with hot caramel sauce (see instructions below).

To make caramel sauce melt butter in saucepan over low heat and then add remaining ingredients. Bring to a boil and then remove from heat. Serve over apple cake squares.

Note: My friend Kip posted a similar recipe on his blog, but included a recipe for a butter sauce that sounds delicious. You can find it here.

Goodbye, Summer!


We all know that summer has been gone for quite a few weeks now. But last week brought the last of our beautiful warm weather, and as a special tribute, I made this salad. It's not a complicated recipe (and none of the items in the salad were grown in our garden). But it was so beautiful that I thought the photo alone was worth sharing.

The shrimp come frozen in a bag from Costco; I thawed them in water and then sauteed them in olive oil and garlic. I drizzled it with a mixture of vidalia onion dressing, also from Costco, mixed with a little bit of mayonnaise (which was intended to tone the dressing down a bit). But the photo with dressing drizzled hid some of the salad's true elegance.

Yesterday the snow flew for the first time. We're looking forward to lots of soup and comfort food, but we'll miss the beautiful and healthy vegetables, or at least the idea of finding them waiting for us in the back yard. But one thing we love about living in Utah is the four seasons. The fact that each one is fleeting helps us to enjoy the unique beauty of any time of year.

Goodbye, Summer! And maybe even Fall.

Tuesday, October 20, 2009

Spinach Pasta Salad


This recipe is originally from my friend Cindy. It's perfect for potlucks because it holds up quite well even after the dressing is added. I made this for dinner one night when Bob and the boys were gone (a girls' night in). The kids laughed because I couldn't stop eating "just another bite."

I modified this recipe a bit by cooking the chicken in a teriyaki sauce (the same one I use for the won ton chicken salad recipe given to me by another friend), but I think it all works out in the wash because I use the dressing for this salad for that recipe.

Spinach Pasta Salad
2-3 chicken breasts
1/2 cup soy sauce
1/2 cup sugar
1 cup water
Mix soy sauce, sugar and water in a small sauce pan; bring to a boil. Add chicken breasts and cook over low heat for about an hour, until chicken is shreddable. Shred chicken and set aside. This can be done the day before if you want.

1 16-ounce package bow-tie or farfalle pasta, cooked according to package directions
1/4 cup green onions, finely chopped
8 to 10 cups of spinach
Combine these ingredients with the shredded chicken in a large bowl.

Dressing:
2-3 Tablespoons of sesame seeds
1/2 cup vegetable oil
1/3 cup white vinegar
1/3 cup soy sauce
3 Tablespoons of sugar
salt and pepper to taste

Pour dressing over the salad and tossed until all ingredients are coated.

Sunday, October 4, 2009

Pear and Blue Cheese Salad


This is the salad I'm making this week for a group of friends I have lunch with each month. It's one of my favorite salads because of the contrasting sweet and savory flavors, plus the crunch of both the fruit and the nuts.

Like most salads, this one is quite versatile. It's great with pears and blue cheese, but also delicious with apples substituted for the pears or feta substituted for the blue cheese. Red fruit is prettier than green fruit, although the green fruit (especially apples) are usually a little more tart and give the salad a great flavor. It's shown here with red delicious apples and blue cheese crumbles.
The salad is originally from the Betty Crocker Entertaining cookbook, which doesn't include the possible variations.

Pear and Blue Cheese Salad
1 medium bunch romaine, chopped in bite-sized chunks
2 medium red or green pears or apples, cut in 1/4 inch slices
1/4 cup crumbled blue cheese or feta (1 ounce)
2 tablespoons chopped walnuts (for the record, pecans also work well)

Toss these ingredients together in a large bowl. Then toss with the dressing until coated.

Dressing
1/4 cup olive or vegetable oil
2 tablespoons cider vinegar
1/2 teaspoon Dijon mustard
1/4 teaspoon salt
Dash of ground pepper

Place ingredients in a tightly covered jar. Shake until mixed.

Best Baked Beans


At about the time Bob and I were married, I learned of the intense competition to be the best bean baker in his family. I thought his baked beans were excellent. But a couple of years ago, one of our neighbors brought this dish to a neighborhood party, and I don't think we've made his usual recipe since. This one takes longer than Bob's, which is made on the stove top. This also makes quite a lot of beans, so feel free to cut the recipe in half if you're not cooking for a crowd.

Baked Beans

8-10 generous servings

4 15-ounce cans of pork and beans
2 large onions, chopped
2 large green peppers, chopped
1 cup catsup
1 cup brown sugar
2 teaspoons Worchestershire sauce
1 pound lean bacon cut up, cooked crisp, then drained and crumbled

Combine ingredients thoroughly. Pour into a 9 x 13 inch baking pan. Bake for 2 1/2 hours, covered with foil, at 325 degrees. Uncover and bake for another 30 minutes. Serve hot.

Saturday, September 26, 2009

Game Day Sausage Dip


With the onset of football season, we have been creating fall appetizers every Saturday afternoon. You can tell by the photo that this is not the world's prettiest snack. But it's one of the most delicious. Our friend Eric made this for a neighborhood party a couple of years ago. We've sort of claimed it as our own by now, and you will too once you try it.

Sausage Dip

1 pound Jimmy Dean sausage
1 15-ounce can Rotel tomatoes (we prefer mild, you can experiment if you like)
1 8-ounce package cream cheese

Brown sausage in a small sauce pan and drain. Add Rotel and cream cheese. Stir over low heat until cheese is melted. Then serve it with tortilla chips.

Friday, September 18, 2009

Sesame Chicken


Our family loves Chinese food of any kind. I don't remember how I came across this recipe for sesame chicken; I don't think I had ever eaten this dish at a restaurant, so I can't imagine that I was actively searching for it. I do know that I found it on some random website, and am sorry that I'm a poor record keeper and can't give appropriate attribution. But this is a relatively quick and inexpensive meal that looks great and tastes even better.

Sesame Chicken
(Serves 8, or in our case, 9)

1 cup flour
2 teaspoons garlic powder
2 teaspoons paprika
2 pounds bloneless, skinless chicken breasts, cut into bite-sized pieces
2 tablespoons toasted sesame seeds*
1 bunch green onion stem, cut into 1-inch slices
4 tablespoons vegetable oil

Sauce:
1/2 cup soy sauce
1/2 cup sugar
2 teaspoons sesame oil

Heat the vegetable oil in a wok or skillet. Combine flour, garlic powder and paprika. Dredge small chicken chunks in flour. Fry pieces in oil until juices run clear.

Meanwhile, in another pot, bring ingredients for the sauce to a boil. Simmer for about 15 minutes.

Pour the sauce over the chicken in the skillet or wok and mix together. Top with toasted sesame seeds and chopped green onions. We like it served with hot rice.

*If you don't have pre-toasted sesame sauce, you can toast the regular kind by tossing them in a hot, oil-free pan for a few minutes over medium heat until they begin to turn golden brown.

Thursday, September 10, 2009

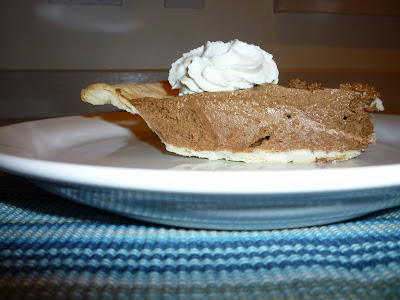
French Silk Pie


My husband Bob loves French silk pie. His particular favorite is the Village Inn version; waiting tables there was one of his college jobs. One night when I was in a particularly benevolent mood, I decided to try to re-create his all-time pie favorite.

The first couple of efforts weren't quite what he had in mind. One recipe was too rich (aren't all French silk pies a little on the rich side?); another was too much like a chocolate cream pie (in other words, not rich enough). But after an adjustment here and an addition there, we have finally reached French silk pie nirvana.

French Silk Pie

(Be aware that Betty Crocker, one of my original sources, warns that using raw eggs in this recipe carries the risk of the eater contracting salmonella. We are all healthy and well after partaking of this pie on multiple occasions, but if you want to eliminate that risk, use 3/4 cup fat-free, cholesterol-free egg product).

Homemade or prepared pastry for one pie
1 cup sugar
3/4 cup butter, softened (margarine won't work; it will curdle the crust)
1 1/2 teaspons vanilla
2 ounces unsweetened baking chocolate, melted and cooled
3 eggs

Bake the pie crust in a nine-inch pan. Cool completely.

In a medium-sized bowl, beat sugar and butter with an electric mixer until light and fluffy. Beat in vanilla and chocolate. Add eggs one at a time, beating for about one minute after adding each one. Pour mixture into pie crust. Refrigerate until set (about two hours, but don't leave it in the fridge for more than 24 hours).

Serve topped with sweetened whipped cream and chocolate sprinkles or curls. I make the curls by using a vegetable peeler on a Hershey bar. They are not the same as Village Inn.
Thursday, September 3, 2009

Tomato Tart


Quite a few years ago I mentioned to a client that I love home grown tomatoes. Love may be an understatement. She told me that she had a recipe I must try. She actually remembered to email it to me, and it's been a favorite ever since. So thanks, Janice! I hope all is well in Tennessee.

This snack is remarkably easy to make, but makes a good impression. Put a homemade or purchased pie crust in a 9-inch tart pan. Spread grated mozzarella cheese on the bottom of the crust until it is completely and evenly covered. Then layer as much chopped basil as you like; I usually use a little more than a quarter cup, but you can go as high as a full cup if you truly love basil.


The order of ingredients in this recipe is important. If the basil isn't mostly covered by sliced tomatoes, it will burn. The juice that emanates from the tomatoes during the baking process also helps protect the basil.

Thinly slice 3-4 Roma tomatoes. You can slice them any way you want, depending on the look you're going for. I chose to slice these the long way for a sort of flower petal effect; I've also sliced them cross-wise, which is lovely. Layer the tomato slices as close to each other as possible in order to cover the basil.


Drizzle the tart with a little bit of olive oil, and bake it at about 375 degrees for 30 minutes, or until the cheese is golden. Slice and serve. This is delicious, but it's best served in appetizer-sized portions; Bob and I tried splitting one for a meal once and it was just too much goodness.

Tomato Tart
1 single homemade or prepared pie crust
About 3/4 cup of grated mozzarella cheese
1/4 to 1 cup of chopped fresh basil, depending on how much you love basil
3-4 thinly sliced Roma tomatoes
Drizzle of olive oil

Put pie crust in a 8 or 9-inch tart pan. Fill the crust with grated cheese. Layer chopped basil on top of the cheese. Top with sliced tomatoes, taking care to cover the basil, and drizzle with olive oil. Bake at 375 degrees for about 30 minutes, or until cheese is golden brown.

Tuesday, July 21, 2009

Quiche


Most of our family loves quiche. Anna hates it, but that is another story. David drew the breakfast category in our cook off and has always wanted to learn to make quiche. This was the perfect opportunity.

Most of what I know about making quiche I learned from my Betty Crocker Entertaining cook book and my next-door neighbor, Cory. BC has a great basic recipe; Cory enlightened us to understand that you can customize quiche to your heart's desire. For example, David loves chives, so we put some chives in the mix. I love finely diced green peppers with eggs, so we added some of those, too. And since we had both Swiss and cheddar cheeses, we made the quiche a cheese festival and added generous amounts of both. We had some diced ham and thought about either adding it to the bacon or replacing the bacon with it, but the bacon won out in the end.

I'll include the recipe's super simple crust recipe, which you don't have to roll and transfer. We simply used a Great Values brand pre-made crust from WalMart, which was truly delicious.

Basic Betty Crocker Quiche

Pat-in-the-Pan pastry (below)
8 slices bacon, cooked and crumbled
1 small onion, finely diced
1 cup shredded Swiss cheese (4 ounces)
4 eggs
2 cups heavy cream
1/2 teaspoon salt
1/4 teaspoon pepper
1/8 teaspoon cayenne pepper

Move the oven rack to its lowest position. Heat oven to 425 degrees. Make the Pat-in-the-Pan pastry (see recipe below).

Sprinkle bacon, cheese and onion in pastry-lined pie or quiche pan. Beat the eggs slightly in a large bowl with a wire whisk or hand beater. Beat in the whipping cream, salt, pepper and cayenne. Carefully pour the egg filling into the pie pan. Place in oven and bake for 20 minutes.

Reduce oven temperature to 300 degrees. Bake about 25 minutes longer or until a knife inserted in the center comes out clean. Place the pan on a wire cooling rack. Let stand ten minutes before cutting.

Pat-in-the-Pan Pastry
1 1/3 cups all purpose flour
1/3 cup vegetable oil
1/2 teaspoon salt
2 tablespoons cold water

Mix the flour, oil and salt with a fork in a medium bowl until all flour is moistened. Sprnkle with cold water, one tablespoon at a time, tossing with a fork until all the water is absorbed. Shape the pastry into a ball, using your hands. Press the pastry in the bottom and up the sides of the pan.

The First Annual Family Cook Off


We recently completed our first annual family cook off. We believe it's important for our kids to leave home knowing how to cook. They haven't always been thrilled about our formal cooking lessons; we thought this might be a more fun way to make sure that each of them had prepared a complete meal on their own.

We aren't completely insane; we only included the five kids who are twelve or older. We started by choosing five types of food and had each of them draw a category. The person who got sandwiches was thrilled; the person who chose Asian food was a little overwhelmed. They got to choose the menu within those constraints. We gave them five or six criteria against which to be judged (presentation, flavor, difficulty, cost, etc.) and asked them to use a five point rating scale--five is good, one is not good. The whole family voted on each person's meal each night. We posted the menu and a running total of the scores to date on the fridge.


The cost was something that obviously couldn't be judged objectively by the kids; having them judge difficulty of a meal was a stretch. We added a cost score in later by calculating the out-of-pocket expenses for that meal (we didn't include the cost of items we already had on hand). Katie, the winner, got to go to lunch with Mom and Dad.

We think the activity was a success. All of the kids did well, and even those who aren't all that interested in cooking took it seriously. The point spread between the high scorer and the low scorer was only five. Most of them agreed to participate again next summer.

Tuesday, July 7, 2009

Focaccia


Last Sunday we decided to make a sort of feast. Bob grilled kabobs and I made focaccia.

I was first introduced to focaccia when I lived in Italy almost 30 years ago. Italians think of it as a sort of pizza; you buy it by weight at the panificio or bread store (which is a specific kind of bakery, distinguished from a pasticeria or pastery bakery). In the Puglia region where I was living it was usually topped with olives and sometimes thinly sliced tomatoes. We usually ate it for breakfast on the run.

In the US, focaccia is usually understood to be a flat bread that can be eaten plain or used for a lovely sandwich. We found our recipe on the back of a 50-pound flour sack; of course we have improvised somewhat to make it our own.

Note: Most Americans pronounce the word focaccia with an -sh sound in the third syllable--focashia. The proper Italian pronunciation is a harder sound, as in focachia.

Focaccia

3 cups flour
2 teaspoons salt
1 Tablespoon sugar
2 1/2 teaspoons instant active dried yeast (if it isn't instant, be sure to activate it by whisking it in the warm water and the tablespoon of sugar)
1 1/3 cups warm water
3 Tablespoons extra virgin olive oil
1 Tablespoon extra virgin olive oil
2 Tablespoons grated parmesan cheese
2 Tablespoons dried rosemary leaves
3 Tablespoons thinly sliced white or yellow onions

Mix flour, salt, sugar, yeast and 3 tablespoons of oil. Mix dough until pliable; I use a stand mixer (Bosch) and knead it for 5-7 minutes. Place dough in oiled bowl. Cover and let rise in a warm place until doubled, about 45 minutes.

Roll the dough into a flat circle, about 1/2 inch to one-inch thick. You can raise it on a baking sheet, or I prefer to raise it on a pizza peel. Where you raise it depends on how you plan to bake it. I prefer to bake the bread on a pizza stone because it leaves it with a crispy crust. If you don't have a stone, you can bake it on the same oiled baking sheet that you raise it on. I find that covering the pizza peel with corn meal helps keep it from sticking to the pizza peel, and also gives the crust a nice grainy finish.

Make dimples by gently pushing your finger into the dough. Brush the dough with the remaining tablespoon of olive oil. Sprinkle on the onions, rosemary, and cheese (the order of these ingredients is important if you want to avoid burning the onions). We sometimes put thinly sliced Roma tomatoes on top as well, especially in the summer when they are in season. Here is what the pre-baked product looks like:


Let the dough rise until doubled, about 35-40 minutes. If you're baking the bread on a pizza stone, heat the oven with the stone inside it to 500 degrees. As soon as you put the bread in the oven, turn it down to 375 degrees. Bake for 15-20 minutes. If you are using a baking sheet, heat the oven to 375 degrees and bake for about 25 minutes. Here's what it looks like when it comes out of the oven.

Saturday, June 27, 2009

Tandoori Chicken


The name of this recipe is a little bit misleading since we do not, in fact, have a tandoor. We do have a nice outdoor grill, which seems to make an acceptable substitute. This is the overall family favorite for Indian food. It's also fairly healthy as long as you use low-fat or non-fat yogurt and trim the chicken.

The original recipe called for adding a bit of red food coloring, which does make the dish look more like something you would get at an Indian restaurant. We don't usually color our food unnecessarily, though, and we like the way it looks without the coloring.

As this recipe has evolved, we have started finishing the chicken in a vegetable basket that is designed to grill vegetables. We put the onion slices under the chicken. Both the look and the flavor of the onions when we do this is unbelievable. Unfortunately, we forgot about this innovation until the chicken was already in the house, so the photo shows the original cooking method.
Tandoori Chicken
Marinade
1 teaspoon dry ground ginger
2 large cloves garlic
1/4 teaspoon tumeric
1 teaspoon chili powder
1 1/2 teaspons salt
1/2 teaspoon ground cumin
1 cup plain low-fat or non-fat yogurt
1 Tablespoon fresh lime juice
Blend all of the ingredients in a blender or food processor and blend until it's well combined.
Chicken
2-3 lbs. boneless, skinless chicken thighs, well trimmed
Pour the marinade over the chicken and stir to coat the chicken thoroughly. Seal in a plastic bag or container, refrigerate, and marinate for at least four but no more than 12 hours. Turn the chicken at least once to ensure that it is evenly coated.
Heat the grill and lay the chicken pieces on the grill about two inches apart. Cover the grill.
After about five minutes, remove the grill lid and turn over the chicken pieces; they should look slightly charred. Replace the lid and continue cooking for another five to seven minutes. Uncover the chicken, turn it over, and leave it uncovered while you cook it for another 2-3 minutes. Test for doneness; the meat should feel firm when you press it.
Garnish (This is our favorite part of the recipe)
1/2 mild onion, thinly sliced
1/2 cup chopped cilantro leaves
1 lime, cut in wedges
Transfer the chicken to a large platter. Arrange the onion, cilantro and lime wedges over the chicken and seal the platter with foil. Let the chicken rest for ten minutes to absorb the garnish flavors. We also like to squeeze the lime juice over the chicken before serving.